
The vocal session is done, your singer gave you five passes of the verse, and somewhere across those takes are all the pieces of a great performance.
- The right emotion in take two
- The cleanest pitch in take four
- That one line in take three that just landed
Now what?
If you’re staring at a track full of audio regions and wondering how to turn this pile of takes into one polished vocal, you’re in exactly the right place. Logic Pro has a built-in system for this, and once you understand how it works, it’s genuinely fast.
It’s called comping, and by the end of this guide, you’ll know exactly how to do it.
What Is Vocal Comping (and Why Logic Makes It Easy)
Comping is short for “composite performance.” The idea is simple: you record several takes of the same section, then choose the best moments from each one and assemble them into a single, seamless track.
Think of it like picking the best photo from a burst shot on your phone. You don’t try to pick while you’re shooting. You shoot first, then pick. The same principle applies here.
Almost every major professional recording you’ve heard was comped. That impossibly perfect vocal on a radio hit? It’s probably stitched together from a dozen passes, with the best syllables from each take carefully selected by a producer or engineer.
Logic makes this process surprisingly approachable. The key feature is called the take folder. Once you see how it works, you’ll wonder how you ever recorded vocals without it.
Before You Record: Set Up Logic Pro for Fast Comping
Most comping tutorials skip this part. Don’t. These setup steps take about 60 seconds and will save you a lot of confusion later.
Step 1: Enable Complete Features.
Quick Swipe Comping (the tool you’ll use to select takes) is only available when Complete Features is turned on. To check:
Go to Logic Pro → Settings → Advanced, and make sure Enable Complete Features is checked.
If this wasn’t on, turn it on now. You won’t see any difference until you open a take folder. But trust me, it matters.
NOTE: In Logic Pro 12, the complete set of features is now always available. The Advanced pane is no longer available in Logic Pro Settings.
Step 2: Set a cycle region around the section you’re recording.
A cycle region is the highlighted yellow bar in the ruler at the top of your main window. It tells Logic exactly where to loop during recording.
The key here is to keep the cycle region short. Record one section at a time: one verse, one chorus, one pre-chorus. Not the entire song in one long loop.
Shorter sections = better takes = easier comping later.
To set the cycle region, click and drag across the ruler where you want it. You can also hold Cmd and drag to reposition it precisely.
Step 3: Arm the track and check your input level.
Make sure your vocal track’s record button (the R button in the track header) is armed. Check that your input level is peaking around -12 dBFS. The level should be loud enough to read clearly, quiet enough to avoid clipping.
Pro tip: Keep the setup consistent between takes. Use the same mic distance and the same headphone mix for the singer. You want takes that are easy to stitch together, not takes that suddenly sound like they were recorded in a different room.
How Cycle Recording Works: The Engine Behind Comping
Here’s what happens when you record with the cycle region active: every time Logic loops, it automatically captures a new take and stacks it on top of the previous one in a take folder on the track.
You don’t do anything except sing (or play). Logic handles the filing.
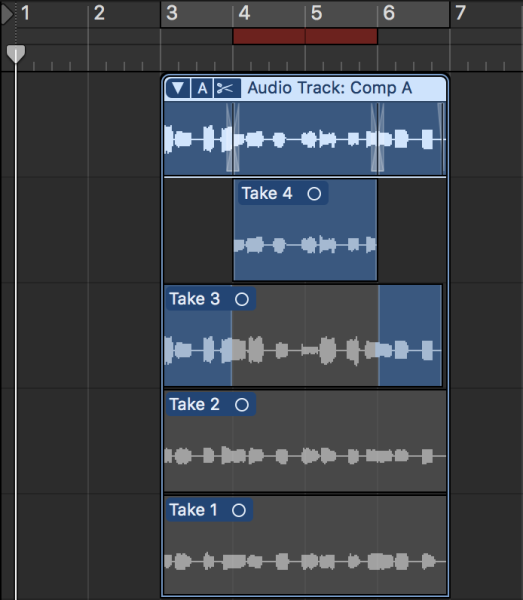
When you stop recording, the track shows a take folder region. It looks like a regular audio region at first, but click the small triangle on the left edge and the individual takes expand below it like a stack of layers.

How many takes should you record?
Three to five per section is usually plenty. More than that, and decision fatigue kicks in — you spend more time auditioning takes than you would have spent on a second session. If you hit five takes and nothing is landing, take a break and come back. The problem is usually the performance, not the workflow.
Step-by-Step: Comp Your Vocals Using Quick Swipe Comping
This is the main event. Work through these steps in order, and you’ll have a finished comp before you know it.
1. Stop recording and look at the take folder.
After your last take, press the Spacebar to stop. You’ll see the take folder region on the track. The name will say something like “Take 5” or “Vocal – Take 4,” depending on how Logic named it.
2. Expand the take folder.
Click the small triangle (disclosure arrow) on the left side of the take folder region. The individual takes appear as stacked lanes below the main region. Each lane is labeled — Take 1, Take 2, and so on.
3. Confirm Quick Swipe Comping is active.
In the top lane of the take folder (the comp lane), there should be a small label showing the active comp name, usually “Comp A.” If the takes look like they’re in a regular editing mode — where you’d cut and drag them — right-click the take folder and make sure Quick Swipe Comping is checked.
When Quick Swipe Comping is on, hovering over any take lane shows a simple cursor. That’s what you want.
4. Listen to your takes.
Before you start swiping, play through each take lane individually. Click the solo button on a take lane (or Option-click the lane) to hear just that pass. Get familiar with which take is strongest in each part of the section.
You don’t need to take notes. Just get a general feel — “take 2 nails the first half, take 4 is cleaner at the end” is enough.
5. Swipe to select your best phrases.
Click and drag across a phrase in the take lane you want. Logic will immediately highlight that selection and update the comp playback in the top lane.
Work section by section. Select the opening line from take 2. Move to take 4 for the middle of the verse. Come back to take 2 or 3 for the last line. You can drag the edges of each selection to fine-tune exactly where one take ends, and another begins.
As you swipe, Logic plays back the comp in real time. Press Spacebar at any point to hear how the assembled performance sounds.
6. Refine your selections.
Go through the comp at least once from the top. Pay attention to where phrases sit against the music. Listen for pitch, timing, and feel, roughly in that order.
Don’t overthink it. A comp that feels natural and emotionally honest is better than a technically perfect one that sounds like a machine assembled it.
7. Create a second comp to compare (optional but worth it).
At the top of the take folder, click the comp name (“Comp A”) to open the comp menu. Choose New Comp to create Comp B. Make different swipe selections and see which version you prefer when you play both back.
This takes about two minutes and has saved many a final mix from sounding oddly robotic.
Flatten the Comp: Turn Your Swipes Into a Clean Track
Once you’re happy with the comp, it’s time to flatten it. This is the step that converts all your swipe selections into a single, clean audio file on the track.
Click the comp name at the top of the take folder and choose Flatten.
Logic will render the comp and collapse the take folder. What was a layered stack of takes becomes one continuous audio region, just like any other piece of recorded audio on the track.
A few things to know:
Your original takes are not deleted. They’re still inside the take folder file on your hard drive. If you ever need to revisit them, you can un-flatten by right-clicking the region and choosing the option to restore the take folder. (Don’t panic if you can’t immediately see how to get back, it’s there.)
Flatten vs. Merge: what’s the difference?
Flatten renders the comp selections into a new audio file. It’s clean, it’s final (in a practical sense), and it’s the right choice for most situations.
Merge is different. It combines the takes into a single region without rendering, which keeps things flexible but can get messy later. For vocal work, flatten is almost always the cleaner call.
After flattening, the take folder view disappears from the track. This is normal. The audio region sitting on the track is your finished comp.
Common Mistakes When Comping Vocals in Logic Pro
Comping while the session is still live. Don’t do it. Finish all your takes first, then comp. Stopping to evaluate takes while the singer is in the booth breaks their momentum and usually produces worse results overall. Record everything, then edit.
Recording the whole song as one long cycle region. This creates a massive take folder that’s hard to navigate. Break it into sections (verse, pre-chorus, chorus, bridge) and comp each one separately.
Swiping too many tiny cuts. If your comp has 15 edit points inside a 4-bar verse, it’s probably going to sound pieced-together. Keep phrases long when you can. One good take of an entire line is almost always better than three tiny edits inside it.
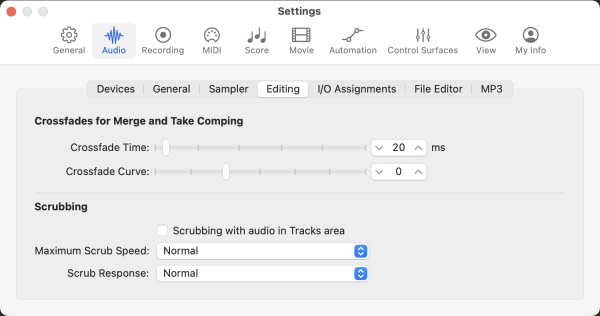
Skipping the crossfades. When you cut between takes, hard edits can create clicks or pops, especially if the background noise level shifts between takes. Use the Crossfade tool (or enable Crossfades for Merge and Take Comping in the Editing pane of Logic Pro → Settings → Audio) to smooth transitions between selections. This is quick, and it makes a noticeable difference.
Forgetting to enable Complete Features. If your version of Logic Pro is below version 12 and Quick Swipe Comping doesn’t seem to work, this could be why. Go back to Logic Pro → Settings → Advanced and check the box.
3 Quick Ways to Speed Up Your Comping Workflow
Once the basics are solid, these three habits will make you noticeably faster.
Use the Tab key to move between phrases.
Instead of clicking each take lane, press Tab to jump to the next edit point in the take folder. It’s much quicker than mousing around, especially on a long section with multiple takes.
Zoom into the take folder for precision.
If two takes are close, and you can’t quite see where the better one starts, press Z with the cursor over the waveform to zoom in. Zooming in locally (rather than globally) gives you a detailed view without losing the context of the whole track.
Name your comps before you flatten.
If you’re building Comp A and Comp B to compare, rename them to something descriptive, for example, “Comp Emotional” and “Comp Clean.” It’s a 10-second step that pays off when you’re back in the session a week later and can’t remember which comp was which.
Troubleshooting: If Something Looks or Sounds Wrong
The take folder is collapsed and I can’t see the takes.
Look for the small disclosure triangle on the left edge of the take folder region. Click it. If the takes still don’t expand, make sure Complete Features is enabled (see the setup section above).
Quick Swipe Comping seems to be off.
Right-click (or Control-click) anywhere inside the take folder and look for Quick Swipe Comping in the contextual menu. If it’s unchecked, click it. The cursor will change to show you’re back in swipe mode.
There are clicks or pops between take selections.
This is a crossfade issue. Select the transition point between two takes, press X to switch to the Crossfade tool, and drag a short crossfade across the edit. Even a 5ms crossfade is usually enough to smooth it out.
Frequently Asked Questions
Does comping delete my original takes?
No. Flattening the comp creates a new audio file from your selections. The original take folder and all its recordings remain in your project folder on the hard drive. You can restore access to them by right-clicking the flattened region and looking for the option to show the take folder.
Can I un-flatten a comp after I’ve already flattened it?
Yes, as long as you haven’t deleted the original take folder file. Right-click the flattened audio region and look for Unflatten or an option to restore the take folder. Logic keeps the original data intact.
How many vocal takes should I record before comping?
Three to five per section is a practical target. Less than three, and you don’t have enough options. More than five, and the decision-making gets exhausting fast. If you’re still not happy after five takes, something other than the number of takes is the issue.
What’s the difference between comping and punching in?
Punching in means stopping the recording, backing up, and re-recording a specific moment in isolation. Comping means recording full passes and selecting the best moments afterward. Comping is generally faster and less disruptive to the performer. You can also use both: comp first, then punch in to fix a specific phrase that didn’t work in any take.
Can I comp MIDI in Logic Pro the same way?
Yes. Take folders work for MIDI recordings too, not just audio. The same cycle recording setup and Quick Swipe Comping workflow applies. This is especially useful for keyboard parts and complex MIDI performances where you want to cherry-pick the best phrases.
What to Do Next
Once your comp is flattened and sitting clean on the track, the next natural step is pitch correction. A well-comped vocal still has moments where tuning needs a small nudge, and Logic Pro’s Flex Pitch makes that quick and non-destructive.
After that, it’s time to build your vocal chain: compression, EQ, some subtle saturation, with reverb and delay on sends. All of it is designed to let the performance breathe and sit right in the mix.
Music should be fun, not frustrating. Comping is one of those workflows that actually feels satisfying once it clicks. There’s something genuinely enjoyable about finding that one phrase in take 3 that’s just right and snapping it into place.
You’ve got this.
Your Logic Pro Coach,
Graham English
Want to go deeper on Logic Pro workflow? Explore the Logic Studio Training blog for more step-by-step guides, tutorials, and tips — all built for home studio creators who want to make more music and finish more tracks.
Free Download
Get the Free Recording Cheat Sheet for Logic Pro
The recording essentials in one quick reference: levels, monitoring, clean MIDI capture, and the takes-and-comping workflow. Enter your name and email and I'll send it right over.
Your information stays private. No spam, no sharing, ever.