
You recorded a vocal take. Most of it is great.
The energy is there, the timing is solid, and the performance feels real.
But a handful of notes are sitting just a little flat, one phrase slides sharp at the end, and you’re not sure what to do about it.
Here’s the good news: you don’t need to buy anything. Logic Pro has a powerful pitch correction tool built right in. It’s called Flex Pitch, and once you know how it works, you can tune your own vocals note by note, in your own studio, for free.
This guide walks you through the whole process: how to turn Flex Pitch on, how to navigate the editing environment, what six Flex Pitch note hotspots actually do, and, just as important, how to avoid the mistake that makes tuned vocals sound robotic.
What is Flex Pitch?
Flex Pitch is Logic Pro’s built-in pitch correction tool. Point it at a monophonic audio recording, such as a lead vocal, a melody line, or a bass part, and it analyzes the audio, detects each note, and displays them as movable bars on a pitch grid. From there, you can drag notes to correct their pitch, fine-tune how they enter and exit, control vibrato, and adjust formants, all without touching your original audio file.
A few things worth knowing upfront:
Flex Pitch is non-destructive. Your original recording stays untouched. Logic processes the edits in real time during playback, and you can turn them off or change them at any point.
Flex Pitch works best on monophonic audio. That means a single vocal line, a guitar melody, a bass recording, one note at a time. It won’t accurately analyze a full chord, a layered arrangement, or a stereo mix. For those situations, you’d need a different approach.
It’s not Auto-Tune. Flex Pitch is a manual pitch editor, not a real-time effect. You record first, then analyze and correct. That distinction matters for how you approach the workflow.
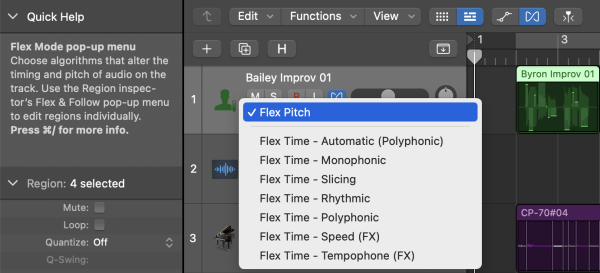
Step 1: Enable Flex Pitch on your vocal track
To turn on Flex Pitch:
- Click the Flex button in the Tracks area menu bar, or press Command-F.
- In your vocal track header, click the Flex Mode dropdown menu.
- Choose Flex Pitch.
Logic analyzes the track and places colored note bars directly over the waveform. You’ll see them appear almost immediately. That’s Logic telling you it’s found the notes in your recording.
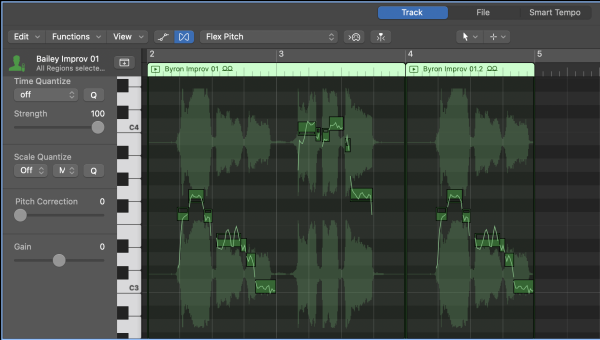
Step 2: Open the Audio Track Editor
The Tracks area is useful for quick, broad pitch edits — moving a note up or down by a semitone or two. But the real Flex Pitch workspace, where all the fine-tuning happens, is inside the Audio Track Editor. That’s where the six Flex Pitch note hotspots live, and where your work will actually sound good.
To open the Audio Track Editor:
- Double-click the vocal region in the Tracks area.
- The Audio Track Editor opens at the bottom of the screen.
- Inside the editor, look for the Flex button (the same bow-tie icon as in the Tracks area). Make sure it’s enabled here too. If Flex Pitch doesn’t appear in the editor, that’s usually why.
Once it’s active, you’ll see a piano-roll-style grid with your detected notes displayed as horizontal bars. Sharp notes sit slightly above the grid line for their pitch. Flat notes sit slightly below. Wavy lines running through each bar show pitch variation happening within the note — vibrato, drift, natural pitch movement.
This is your editing environment. Take a moment to zoom in (use the zoom slider at the bottom right) so you can see individual notes clearly.
Step 3: Correct pitch — the basics
The most direct edit in Flex Pitch is also the simplest: drag a note up or down.
Each horizontal line on the grid is one semitone. Drag a note bar up to raise its pitch, down to lower it. As you drag, Logic plays back the note at its new position so you can hear the result in real time.
The quickest workflow for a first pass:
- Press Play and listen to the vocal from the top.
- When something sounds off, stop and find that note in the editor.
- Drag it to the correct pitch position.
- Play back that section again to confirm.
- Repeat through the whole performance.
Pro tip: Use your ears, not just your eyes. A note bar that looks perfectly centered on the grid line can still sound slightly off, depending on the musical context. And a note that sits a few cents sharp might actually be right for an expressive vocal phrase. Trust what you hear.
For a fast global pass, press Command-A to select all notes, then look for the Pitch Correction slider in the lower-left area of the Audio Track Editor. Drag it to the right to nudge all notes closer to pitch. This is useful for a track that’s mostly in tune but needs a gentle overall correction — more on this in a moment.
The most important principle: don’t over-correct
Before we go any further, this needs its own section. Because it’s the thing that separates a professional-sounding vocal tune from one that sounds like a robot.
Snapping every note to exactly zero cents is not the goal.
Real singing contains natural pitch variation: the way a phrase starts slightly flat and rises to center, the vibrato on a held note, the subtle slide between two words. That movement is part of what makes a vocal sound human. When you eliminate all of it, the performance loses its life, and the tuning can actually sound worse even though every note technically reads as correct.
The goal is musical pitch correction, not mechanical quantization.
In practice, that means:
- Fix notes that are genuinely off, especially ones that pull at your ear every time you listen.
- Leave slight natural variation intact on notes that sound fine.
- Use your ears as the final judge, not the pitch grid.
- When in doubt, do less. You can always come back and do more.
Keep this in mind throughout everything that follows.
The six Flex Pitch note hotspots — what each one does
When you hover over a note bar in the Audio Track Editor, six hotspots appear. Each one controls a different aspect of that note. Here’s what they are and when you’d actually reach for them.
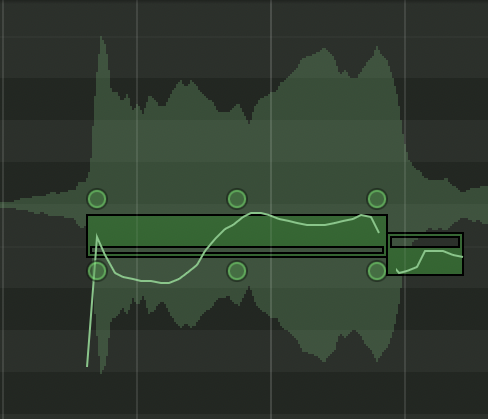
Fine Pitch (lower-mid)
This adjusts the note’s pitch in cents — fractions of a semitone. One hundred cents equals one semitone, so this is for small corrections when a note is close but not quite there.
The number that appears shows how far from the center the note sits. Positive numbers mean sharp, negative numbers mean flat. Drag up to sharpen, down to flatten.
Control-click a note and choose Set to Perfect Pitch to snap it to center pitch. This is useful for a note that’s genuinely too far off to leave. Just don’t do it to every note at once. That’s how you get the robotic sound.
Pitch Drift — Start (top left) and End (top right)
These two hotspots control how the note enters and exits its pitch. The start drift handles the slide into the note. The end drift handles the slide out.
Singers naturally glide into and out of notes. That’s part of expression. If those slides are too wide, reduce the drift. If the note starts sharp and then centers, the start drift is the tool. If it falls flat at the end of a phrase, the end drift is where you go.
Avoid taking both all the way to zero on everything. A note with no drift at all can feel abrupt and unnatural, especially on vowel-heavy phrases.
Vibrato (upper mid)
This controls the amount of pitch variation through the center of the note — the natural oscillation of a singer’s voice on a sustained vowel.
Reduce vibrato to steady a note that wobbles too much. Increase it to emphasize a note’s natural movement. Taking it all the way to zero tends to make notes sound stiff, especially on longer-held notes. A little vibrato is almost always better than none.
Gain (lower left)
This adjusts the volume of the individual note. It’s useful when one word or syllable is noticeably louder or quieter than the rest of the performance, and you’d rather fix it here than reach for more compression on the whole track.
Formant Shift (lower right)
Formants are the resonant frequencies that give a voice its characteristic sound. When you move a note’s pitch by a large amount (more than three or four semitones), the formants shift with it, which can make the voice sound unnatural. The classic version of this is the “chipmunk” effect when pitching vocals up.
The Formant Shift parameter lets you compensate. If you pitch a note up significantly, shift the formant down a bit to counteract the effect. For small corrections (under a semitone), you’ll rarely need to touch this at all.
Quick pitch correction: when to use it, and when to be careful
The Pitch Correction slider and Scale Quantize menu in the Audio Track Editor let you apply automatic correction across selected notes.
How to use it:
- Set the Scale Quantize dropdown to the key of your song. This tells Logic which pitches to snap toward.
- Select the notes you want to correct (or Command-A for all).
- Drag the Pitch Correction slider to the right.
At lower values, the slider nudges notes toward the scale without fully committing them. At higher values, it pulls notes tighter to the grid. At 100%, notes snap hard to the nearest scale pitch.
The honest guidance: 100% pitch correction on every note is a shortcut, not a destination. Use the slider to quickly get a track into the right ballpark, then go back with the individual hotspots to restore the natural feel to notes that need it. The slider is a starting point, not a finishing move.
Also worth noting: choose the correct key before applying any scale quantize. The wrong key setting will pull some notes to the wrong pitch entirely.
Bonus: build a harmony from one vocal take
Here’s a creative application of Flex Pitch worth knowing about, and it costs you nothing extra.
Once you’ve tuned your lead vocal, duplicate the track, apply Flex Pitch to the duplicate, select all the notes, and drag them up by a third or a fifth. You’ve just built a harmony from a single recording.
Step by step:
- Hold Option and drag your vocal track header downward to duplicate the track and its region.
- Enable Flex Pitch on the new track (if it isn’t already).
- Open the Audio Track Editor for the duplicate.
- Press Command-A to select all notes.
- Drag the notes up to your target interval. Four semitones give you a major third. Seven semitones gives you a fifth.
- Pan the original slightly left and the harmony slightly right for width.
For larger transpositions, use the Formant Shift hotspot to dial back the unnatural tonal shift that comes with moving a voice significantly outside its natural range. Stack two or three duplicates at different intervals, and you have full harmonies from a single take.
Common Flex Pitch mistakes (and how to avoid them)
Mistake 1: Can’t find the Flex button. If you don’t see the Flex button in your toolbar, right-click the toolbar and add it manually, or use Command-F.
Mistake 2: Flex Pitch is on in the Tracks area, but the Audio Track Editor shows nothing. The Flex button needs to be enabled separately in the editor. Look for the bow-tie icon in the Audio Track Editor menu bar and make sure it’s active.
Mistake 3: “Set All to Perfect Pitch” makes the vocal sound worse. Control-clicking a note and choosing Set All to Perfect Pitch removes natural pitch variation. Use it selectively, on genuinely off notes only. For a gentle global correction, use the Pitch Correction slider instead.
Mistake 4: Flex Pitch on a polyphonic or layered region. Flex Pitch is for monophonic audio only. Applying it to a stereo mix, a chord guitar part, or a doubled vocal will produce inaccurate and often messy results. Isolate the single instrument or voice first.
Mistake 5: Editing consonants and breaths. Pitch correction belongs on the vowel center of each note, where sustained pitch lives. Avoid editing the very start and end of notes where consonants and breaths appear. Correcting those areas adds artifacts without improving the tune.
Frequently asked questions
Does Flex Pitch work on guitar? Yes, for single-note melodic lines. It works well on lead guitar, bass, or any monophonic instrument. It won’t analyze a chord accurately.
Will Flex Pitch change my original audio file? No. Flex Pitch is completely non-destructive. Your original recording stays exactly as it was. You can turn Flex off at any point and return to the unedited audio.
Can I undo Flex Pitch edits? Yes. Command-Z undoes individual edits. You can also disable Flex Pitch on the track entirely to hear the original without losing your edits.
Does Flex Pitch work on Logic Pro for iPad? Logic Pro for iPad can play back Flex Pitch edits created on Mac, but it does not currently offer the full Flex Pitch editing workflow available in Logic Pro for Mac. You can adjust some Flex parameters in the Track Inspector, but detailed Flex Pitch editing is still primarily a Mac feature.
Do I need Melodyne if I have Flex Pitch? For most home studio vocal tuning tasks, Flex Pitch is enough. It handles small-to-moderate corrections well and sounds good when used with care. Melodyne has advantages for certain specialized tasks, but if you haven’t fully explored Flex Pitch yet, start there before spending more money.
Putting it all together
Here’s the full Flex Pitch workflow in a single reference list:
- Enable Flex view in the Tracks area menu bar
- Set the vocal track’s Flex Mode dropdown to Flex Pitch
- Open the Audio Track Editor and enable Flex inside it
- Listen through and identify notes that need correction
- Drag off-pitch notes to the correct semitone position
- Zoom in and use the six hotspots to fine-tune: Fine Pitch for small adjustments, Pitch Drift for entry and exit, Vibrato for natural movement, Gain for note volume, Formant Shift for large transpositions
- Use the Pitch Correction slider with Scale Quantize for a gentle global pass if needed
- Play back and trust your ears. Subtle corrections almost always sound better than hard snaps
One last reminder: the goal is a vocal that sounds like the singer on their best day, not a vocal that reads perfectly on a pitch graph. Use Flex Pitch to serve the performance, not replace it.
And if you want to go further, once your vocals are tuned and your arrangement is humming, check out How to Use Chord ID in Logic Pro 12 to get your Session Players following the same harmony as your recording.
Free Download
Get the Free Logic Pro Quick Start Guide
The key workflows, settings, and shortcuts to get up and running in Logic Pro fast. Enter your name and email and I'll send it right over.
Your information stays private. No spam, no sharing, ever.