
You open Logic, start a new project, and spend the next 45 minutes loading tracks, programming basic MIDI, and adjusting levels before you've even heard whether the direction is worth pursuing.
By the time you have something to react to, the idea has gone cold.
There's a faster approach, and it's been sitting inside Logic the whole time.
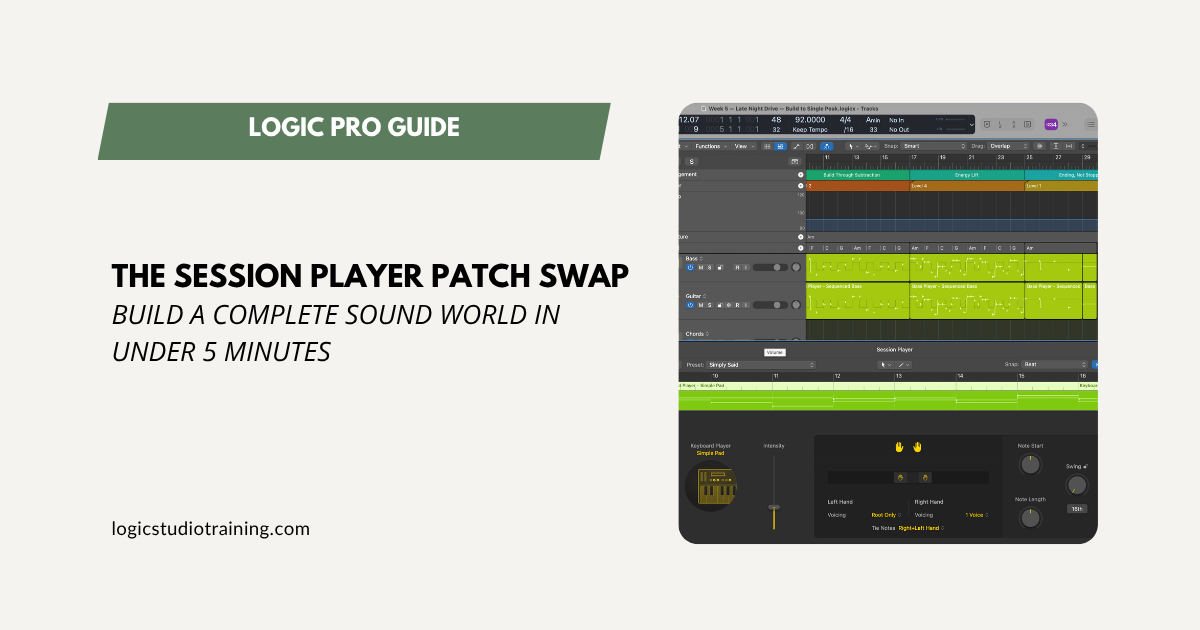
Most producers use Session Players at face value: a drum beat here, a bass line there. What they don't realize is that a Session Player is actually two things working together: an intelligent performance engine and a patch slot that can hold almost any sound Logic offers.
Swap the patch underneath the engine, and you've just turned a basic accompaniment tool into a real-time sound world sketching machine. By the end of this post, you'll be able to rough out a complete sound world in under five minutes.
Quick Background: What Session Players Actually Are
If you've used Session Players before, you know the basics. Logic gives you three types: Drummer, Bass Player, and Keyboard Player. Each one generates performances based on a built-in style library. You pick a style, adjust the feel, and it plays.
Bass Player and Keyboard Player don't just play: they follow your Chord Track. Whatever chords you set, they perform over them automatically. Change a chord, they change. Add a chord region, and they react.
The performance engine and the patch (the actual sound) are separate layers. The engine handles what gets played, and the patch determines how it sounds.
That separation is the whole trick. Once you understand it, you stop thinking of Session Players as preset accompaniment and start thinking of them as performance tools you can dress in any sound Logic has to offer.
Technique 1: The Self-Playing Wurlitzer
This is the one that tends to surprise students when I show it in a session.
The idea: Load a Keyboard Session Player, swap the patch to a Wurlitzer or Rhodes, and let it perform your chord progression without touching a single MIDI note.
Step-by-step:
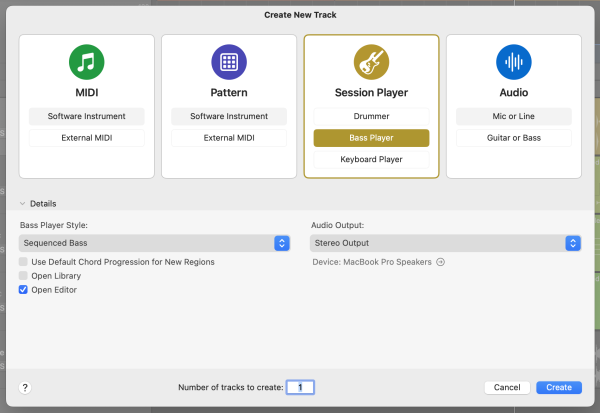
- Add a Keyboard Session Player track
- Open the Chord Track (Track menu → Show Chord Track)
- Set a few chords (even a simple two-chord loop is enough)
- In Smart Controls, click the instrument patch name
- Browse to Electric Piano and select a Wurlitzer or Rhodes patch
- Press play
That's it.
What you're listening for isn't perfection. It's direction. Does the harmonic feel match the sound world you're imagining? If yes, you've confirmed a direction in minutes. If no, swap to a pad, an organ, or a synth texture and try again. You're not committing to anything yet, just listening.
Why this matters: Sound world decisions belong before production decisions. This technique forces that order. Speed is the point, not technical finesse.
Technique 2: The Instant Bass Double
This one works especially well in rock, indie, or lo-fi production, where a little string character in the low end can make a rhythm section feel alive before it's fully built.
The idea: Duplicate a Bass Player Session Player track, swap the patch to a clean guitar preset, and transpose it up an octave. You now have an automatic bass double that follows your Chord Track alongside the original.
Step-by-step:
- Create a Bass Player Session Player and dial in a style
- Duplicate the track (Command + D)
- On the duplicate, click the patch name and browse to a clean electric guitar preset (Amp Designer with a clean setting works well)
- In the Region Inspector or Smart Controls, transpose the track up +12 semitones (only if you need to — depending on the bass part, you might not)
- Blend the guitar level down so it sits under the bass, not competing with it
Listen for the guitar adding brightness and string texture without crowding the low end. If it's too present, pull the level back or cut EQ around 300–400 Hz.
Why this matters: You've built a rhythm section sketch with two tracks and no MIDI programming. Both follow the same Chord Track, respond to the same style settings, and stay locked together automatically. That's a lot of character for very little setup.
Technique 3: The Drummer as Texture (Bonus)
Fair warning: this one is more of a creative experiment than a reliable production tool.
The idea: Swap a Drummer Session Player's patch to something melodic or tonal.
You won't get usable melodic content. What you'll get is rhythmically dense, tonally unpredictable material, the kind of thing that can work as a texture layer or, if you're into sampling, as raw material to chop and repitch.
The real value here is demystification. When you hear what happens after pulling the drum sounds out from under the performance engine, the whole Session Player concept clicks in a way that description alone never does. Try it once, and you'll learn something about the engine that carries forward into every other technique.
Connecting These Techniques to a Workflow
These aren't just interesting tricks in isolation. They fit into something specific: the moment in a session when you need to choose a direction before committing the time to build it.
Think of it in two stages.
The Choose stage is about deciding what kind of sound world you're working in, before you spend real time on production. Session Players with swapped patches let you hear candidates in minutes.
The Build stage is where production begins. Once you've confirmed a direction, convert your Session Player regions to MIDI (right-click the region → Convert to MIDI Region), swap in your final patches, and begin true production from a place of clarity instead of guesswork.
That sequence (choose first, build second) saves more time than any single workflow trick. The Session Player patch swap just makes the Choose stage faster and more decisive.
Give It a Try
The next time you open a new project, spend the first five minutes on this before doing anything else. Load a Keyboard Session Player, set two chords, swap the patch, and press play. See what you hear.
You might confirm a direction you already had in mind. You might land somewhere you didn't expect. Either way, you'll have something real to react to, which is always better than a blank canvas.
Your Logic Pro Coach,
Graham