
If you’ve ever exported a track that sounded loud in your session but quiet on Spotify, LUFS is the reason, and the fix.
This guide explains what LUFS means, how to measure it inside Logic Pro, and exactly what targets to hit before you upload to any streaming platform.
What Is LUFS?
LUFS stands for Loudness Units Full Scale. It’s the international standard for measuring perceived loudness in audio. It measures not only the signal level but also how loud something actually sounds to human ears.
The number is always negative. Zero LUFS represents the maximum level before digital clipping. Everything below that is expressed as a negative value: -14 LUFS, -23 LUFS, and so on. Lower numbers mean quieter perceived loudness.
Why does this matter? Because platforms like Spotify and Apple Music use LUFS to normalize playback volume across every track in their catalog. If your master is louder than their target, they turn it down. If it’s quieter, they may boost it. Either way, the platform controls the final listening volume. not you.
Understanding LUFS means you stop chasing loudness and start making better decisions about dynamics.
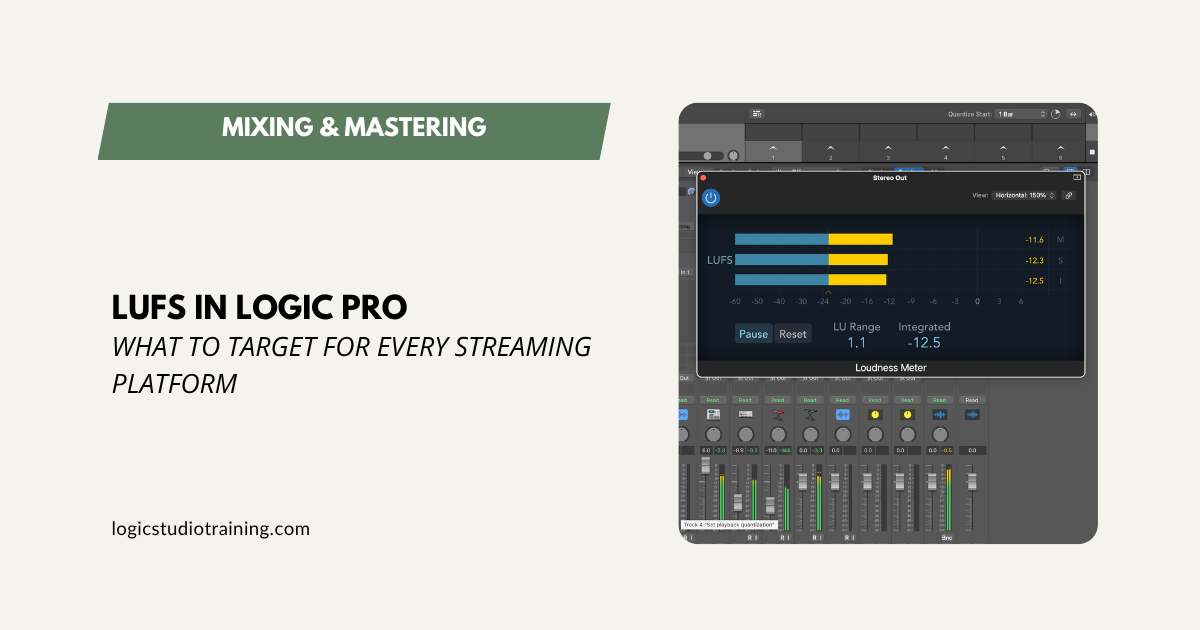
Three Types of LUFS Measurements
Logic Pro’s Loudness Meter shows you three measurements at once. Each one tells you something different.
Integrated LUFS (I) measures the average loudness across your entire track from start to finish. This is the number that streaming platforms care about most. It’s what you target during mastering.
Short-term LUFS (S) measures average loudness over a rolling three-second window. It shows you how loudness moves through your track, which is useful for spotting loud choruses or quiet verses that fall outside your target range.
Momentary LUFS (M) measures loudness in 400-millisecond snapshots. It catches brief, loud spikes before they cause problems downstream. For example, a sudden snare hit, or a burst of reverb tail
During a mix session, watch all three. During mastering, focus on Integrated.
Streaming Platform Targets in 2025
Every major platform normalizes differently. Here’s where things stand:
Spotify uses three normalization settings that listeners can choose from in their app preferences: Quiet (-23 LUFS), Normal (-14 LUFS), and Loud (-11 LUFS). The default is Normal, so -14 LUFS integrated is still the practical target for most releases. Spotify’s reference level is user-selectable between -19, -14, and -11 LUFS.
Apple Music normalizes at -16 LUFS using its Sound Check system. It also applies strict True Peak limits. Apple Music normalizes tracks at -16 LUFS with True Peak limits of -1 dBTP.
YouTube sits between -13 and -14 LUFS.
Amazon Music targets approximately -14 LUFS.
TikTok and Instagram Reels allow louder masters due to the short-form, high-energy context of the platform.
Broadcast Television follows ITU-R BS.1770, which sets a target of -24 LUFS, which is significantly quieter than streaming.
Practical takeaway: A well-balanced master around -14 LUFS with -1 dBTP true peak is generally safe across all platforms. You don’t need separate masters for every service.
Don’t Forget True Peak
LUFS measures perceived loudness. True Peak (-dBTP) measures the actual sample-level ceiling of your audio after it’s been converted to a lossy format like AAC or MP3.
When your master is encoded for streaming, inter-sample peaks can clip even if your meters showed headroom in Logic. True Peak limiting catches those before they cause distortion on playback.
Set your limiter’s output ceiling to -1 dBTP on every master heading to streaming. This is not optional. It’s the one technical step most home producers skip, and it’s the one that creates audible distortion on Apple Music and Spotify.
How to Measure LUFS in Logic Pro
Logic Pro includes a native Loudness Meter plugin — no third-party tools required.
Using the Loudness Meter plugin:
- In the Stereo Out channel strip, open the Audio FX slot.
- Navigate to Metering > Loudness Meter and insert it.
- Hit play from the very top of your session and let it run to the end without stopping.
- When playback finishes, read the I (Integrated) field. That’s your LUFS number.
- The meter turns yellow when loudness exceeds your target line. Drag the target line to -14 LUFS as your starting reference.
Pro Tip: The Loudness Meter’s Start/Pause button lets you measure a specific section rather than the full track. Use this to check a loud chorus or a quiet intro against your target.
Using Logic Pro’s Mastering Assistant:
Logic Pro 10.8 and later includes a built-in Mastering Assistant that handles LUFS targeting as part of its workflow. Add it to the Stereo Out channel strip, select your target platform, and it applies gain compensation automatically. It’s a fast way to get a loudness-compliant export without touching the Loudness Meter manually.
Third-party alternatives worth knowing:
Youlean Loudness Meter (free), iZotope Insight 2, and FabFilter Pro-L 2 all display LUFS and True Peak simultaneously, which is useful if you want more visual detail than Logic’s native plugin provides.
The Loudness War Is Over — Here’s What That Means for You
The top 25 tracks on Spotify average -8.4 LUFS, nearly 6 dB louder than Spotify’s -14 LUFS target. Those tracks get turned down on playback, and the aggressive limiting that made them loud accomplishes nothing volume-wise. It only destroys dynamic range.
A carefully mastered track at -14 LUFS plays back untouched, while a slammed -8 LUFS master gets pulled down by 6 dB, retaining punch, depth, and transient detail.
This is the most important mindset shift in modern mastering: you are not competing for volume on Spotify. You are competing for clarity, feel, and dynamics. A louder master won’t help you. A better-sounding master will.
Tips for Mixing and Mastering with LUFS in Mind
1. Check loudness during mixing, not just at the end.
Keep the Loudness Meter on your Stereo Out throughout your mix. If your Integrated LUFS is already near -6 before mastering, you’ve over-compressed and have little room left to work with.
2. Set a True Peak ceiling before you limit.
Set your limiter’s output to -1 dBTP. Then aim for your target Integrated LUFS value. In that order.
3. Don’t chase -14 LUFS at the cost of feel.
If your track is dynamic (lots of quiet and loud sections) it may naturally land at -16 or -18 LUFS integrated. That’s fine. A track with great dynamics that gets slightly boosted by Spotify still sounds better than a slammed track that gets turned down.
4. Master to platform, but mix to your monitors.
Your mix should sound great in your studio before you ever open a loudness meter. LUFS is a delivery spec, not a creative target.
5. Use the Mastering Assistant as a reality check.
Logic Pro’s Mastering Assistant gives you a fast loudness-compensated preview of your master. Use it to catch problems early, not as a substitute for careful mixing.
Conclusion
LUFS is the measurement that connects your Logic Pro session to the listening experience on every platform your music reaches. Get it right, and your tracks compete on feel and dynamics. Get it wrong, and the platform makes that decision for you.
The practical targets are straightforward: aim for -14 LUFS integrated, keep True Peak at -1 dBTP, and preserve the dynamics that make your music worth hearing.
Free Download
Get the Free Logic Pro Mixing Cheat Sheet
The essential mixing reference for Logic Pro — key settings, signal flow, and mix decisions on one page. Enter your name and email and I'll send it right over.
Your information stays private. No spam, no sharing, ever.