
Logic Pro is sitting on your Mac.
You've opened it once or twice. Maybe you stared at the interface for a few minutes, clicked around, felt a little lost, and closed it again.
That's more common than you think. Logic Pro is one of the most powerful music production apps in the world, and it looks like it. The good news is that you don't need most of it to make great music. You need about six things. This guide covers those six things, in the order you'll actually use them, with enough context to make each one click.
By the end, you'll know how to set up Logic Pro correctly, record your first track, build a full arrangement, mix it down, and export a finished song. A real, finished song.
The goal here is simple: get you making music this week.
What is Logic Pro, and do you need it?
Logic Pro is Apple's professional digital audio workstation, built for Mac and iPad. It's the tool behind countless hit records, film scores, and podcasts. It handles recording, MIDI programming, arranging, mixing, and mastering, all inside one app, with a single one-time purchase of $199.99 from the Mac App Store. Every instrument, every effect, every sound library, and every future update is included. No subscriptions for the core software, no locked tiers, no surprise upgrade fees.
For musicians, singer-songwriters, and home studio producers who want professional-sounding results without renting studio time or hiring engineers, Logic Pro is one of the best investments you can make.
If you're still on GarageBand and wondering whether it's worth the jump, the short answer is yes. Skip to the next section and I'll explain exactly why.
If you're brand new to music production software entirely, welcome. You're starting in a good place.
Coming from GarageBand? What carries over and what's new
If you've been making music in GarageBand, a lot of Logic Pro will feel immediately familiar. That's by design. Apple built Logic Pro on the same foundation.
What works the same way:
- The Library (press Y): same interface, same browsing experience, and many of the same patches and sounds
- Smart Controls (press B): the same simplified knobs and sliders for adjusting instrument and effect parameters
- Apple Loops: the entire GarageBand loop library is in Logic Pro, plus a much larger collection on top of it
- Software Instrument tracks, audio tracks, and the Drummer track all work the same way at a basic level
What's new in Logic Pro:
- A full Mixer window (press X) with individual channel strips, send effects, and bus routing
- Flex Time and Flex Pitch for fixing the timing and tuning of recorded audio
- Alchemy, Logic's flagship professional synthesizer
- Step Sequencer for pattern-based programming
- Session Players: AI-powered Bass Player, Keyboard Player, and Synth Player that follow your song's harmony
- Chord ID, which analyzes any audio or MIDI recording and figures out the chord progression automatically
- Advanced MIDI editing, automation, and Spatial Audio mixing for Dolby Atmos
One more thing worth knowing right away: you can open your GarageBand projects directly in Logic Pro. File > Open, navigate to your GarageBand project, and Logic converts it automatically. No import, no conversion, no lost work. Your past projects grow with you.
The Logic Pro 12 interface, in plain English
When you open a project in Logic Pro, five areas do most of the work. You don't need to memorize every button in all five, but knowing what each zone is for will save you a lot of time.
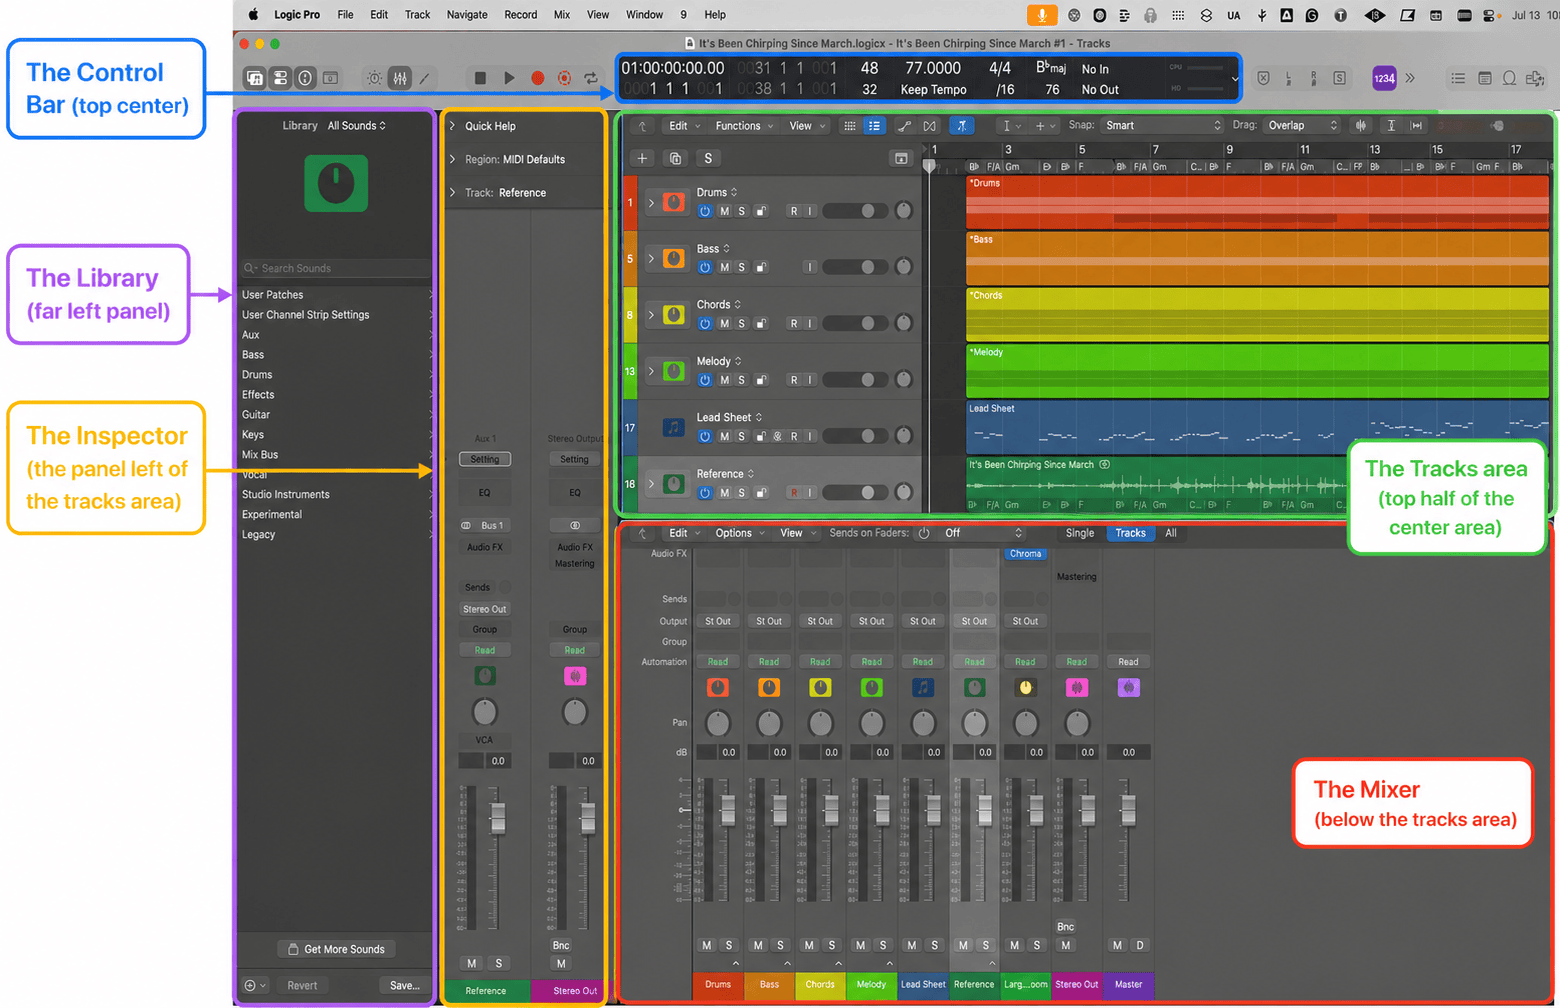
The Control Bar (top center)
This is your dashboard. It shows your tempo, your project key and time signature, the transport controls (play, stop, record), and a row of buttons that show and hide everything else. If something disappears from your screen, the answer is almost always a button in the Control Bar.
The Tracks area (center)
This is where your song lives. Left to right is time. Top to bottom is your different instruments and audio tracks. Every region you record or import sits here as a colored block. The Tracks area is where you arrange your song.
The Inspector (left panel)
The Inspector shows settings for whatever you have selected. Click a track, and it shows that track's settings. Click a region, and it shows that region's settings. It updates constantly based on what you're looking at.
The Library (press Y)
Browse and load sounds, instrument patches, and channel strip settings. Press Y to show or hide it. If you can't hear any sound when you play a software instrument, the Library is usually where you'll go to load a patch.
The Mixer (press X)
The Mixer shows every track as a vertical channel strip with a fader, pan knob, and effect slots. This is where you balance levels and shape your sound once you've recorded and arranged everything.
There are other windows and editors you'll encounter as you go deeper: the Piano Roll for MIDI editing, the Audio Track Editor for Flex Pitch, the Smart Tempo editor. You'll get to those naturally. For now, those five zones are your home base.
First things first: set up your audio
Before you record a single note, Logic Pro needs to know how it's getting sound in and out of your Mac. Getting this wrong is the number one reason beginners feel like something is broken when it isn't.
If you're using a USB or Thunderbolt audio interface:
- Connect your interface to your Mac before opening Logic Pro.
- Go to Logic Pro > Settings > Audio (or Preferences > Audio on older versions).
- Set the Input Device to your interface.
- Set the Output Device to your interface.
- Click Apply Changes.
If you're using your Mac's built-in audio:
Built-in audio works fine for software instruments and headphone monitoring. It's not ideal for recording vocals or guitars with a microphone, but it gets you started.
Buffer size:
Lower buffer size means less latency when you're playing and recording, which matters because you want to hear yourself in real time without a noticeable delay. Higher buffer size means less CPU strain during mixing. A practical starting point: set the buffer to 128 samples when recording, and bump it to 512 samples when you're mixing and not actively recording.
You'll find the buffer size setting in the same Audio preferences window.
Pro tip: If you hear crackling, popping, or dropout during playback, the buffer size is usually too low for your current project. Raise it.
Creating your first project
Open Logic Pro and you'll see the Project Chooser. Choose New Project > Empty Project. Resist the templates for now. Templates are great once you know what you want, but when you're learning the layout, starting clean gives you much better visibility.
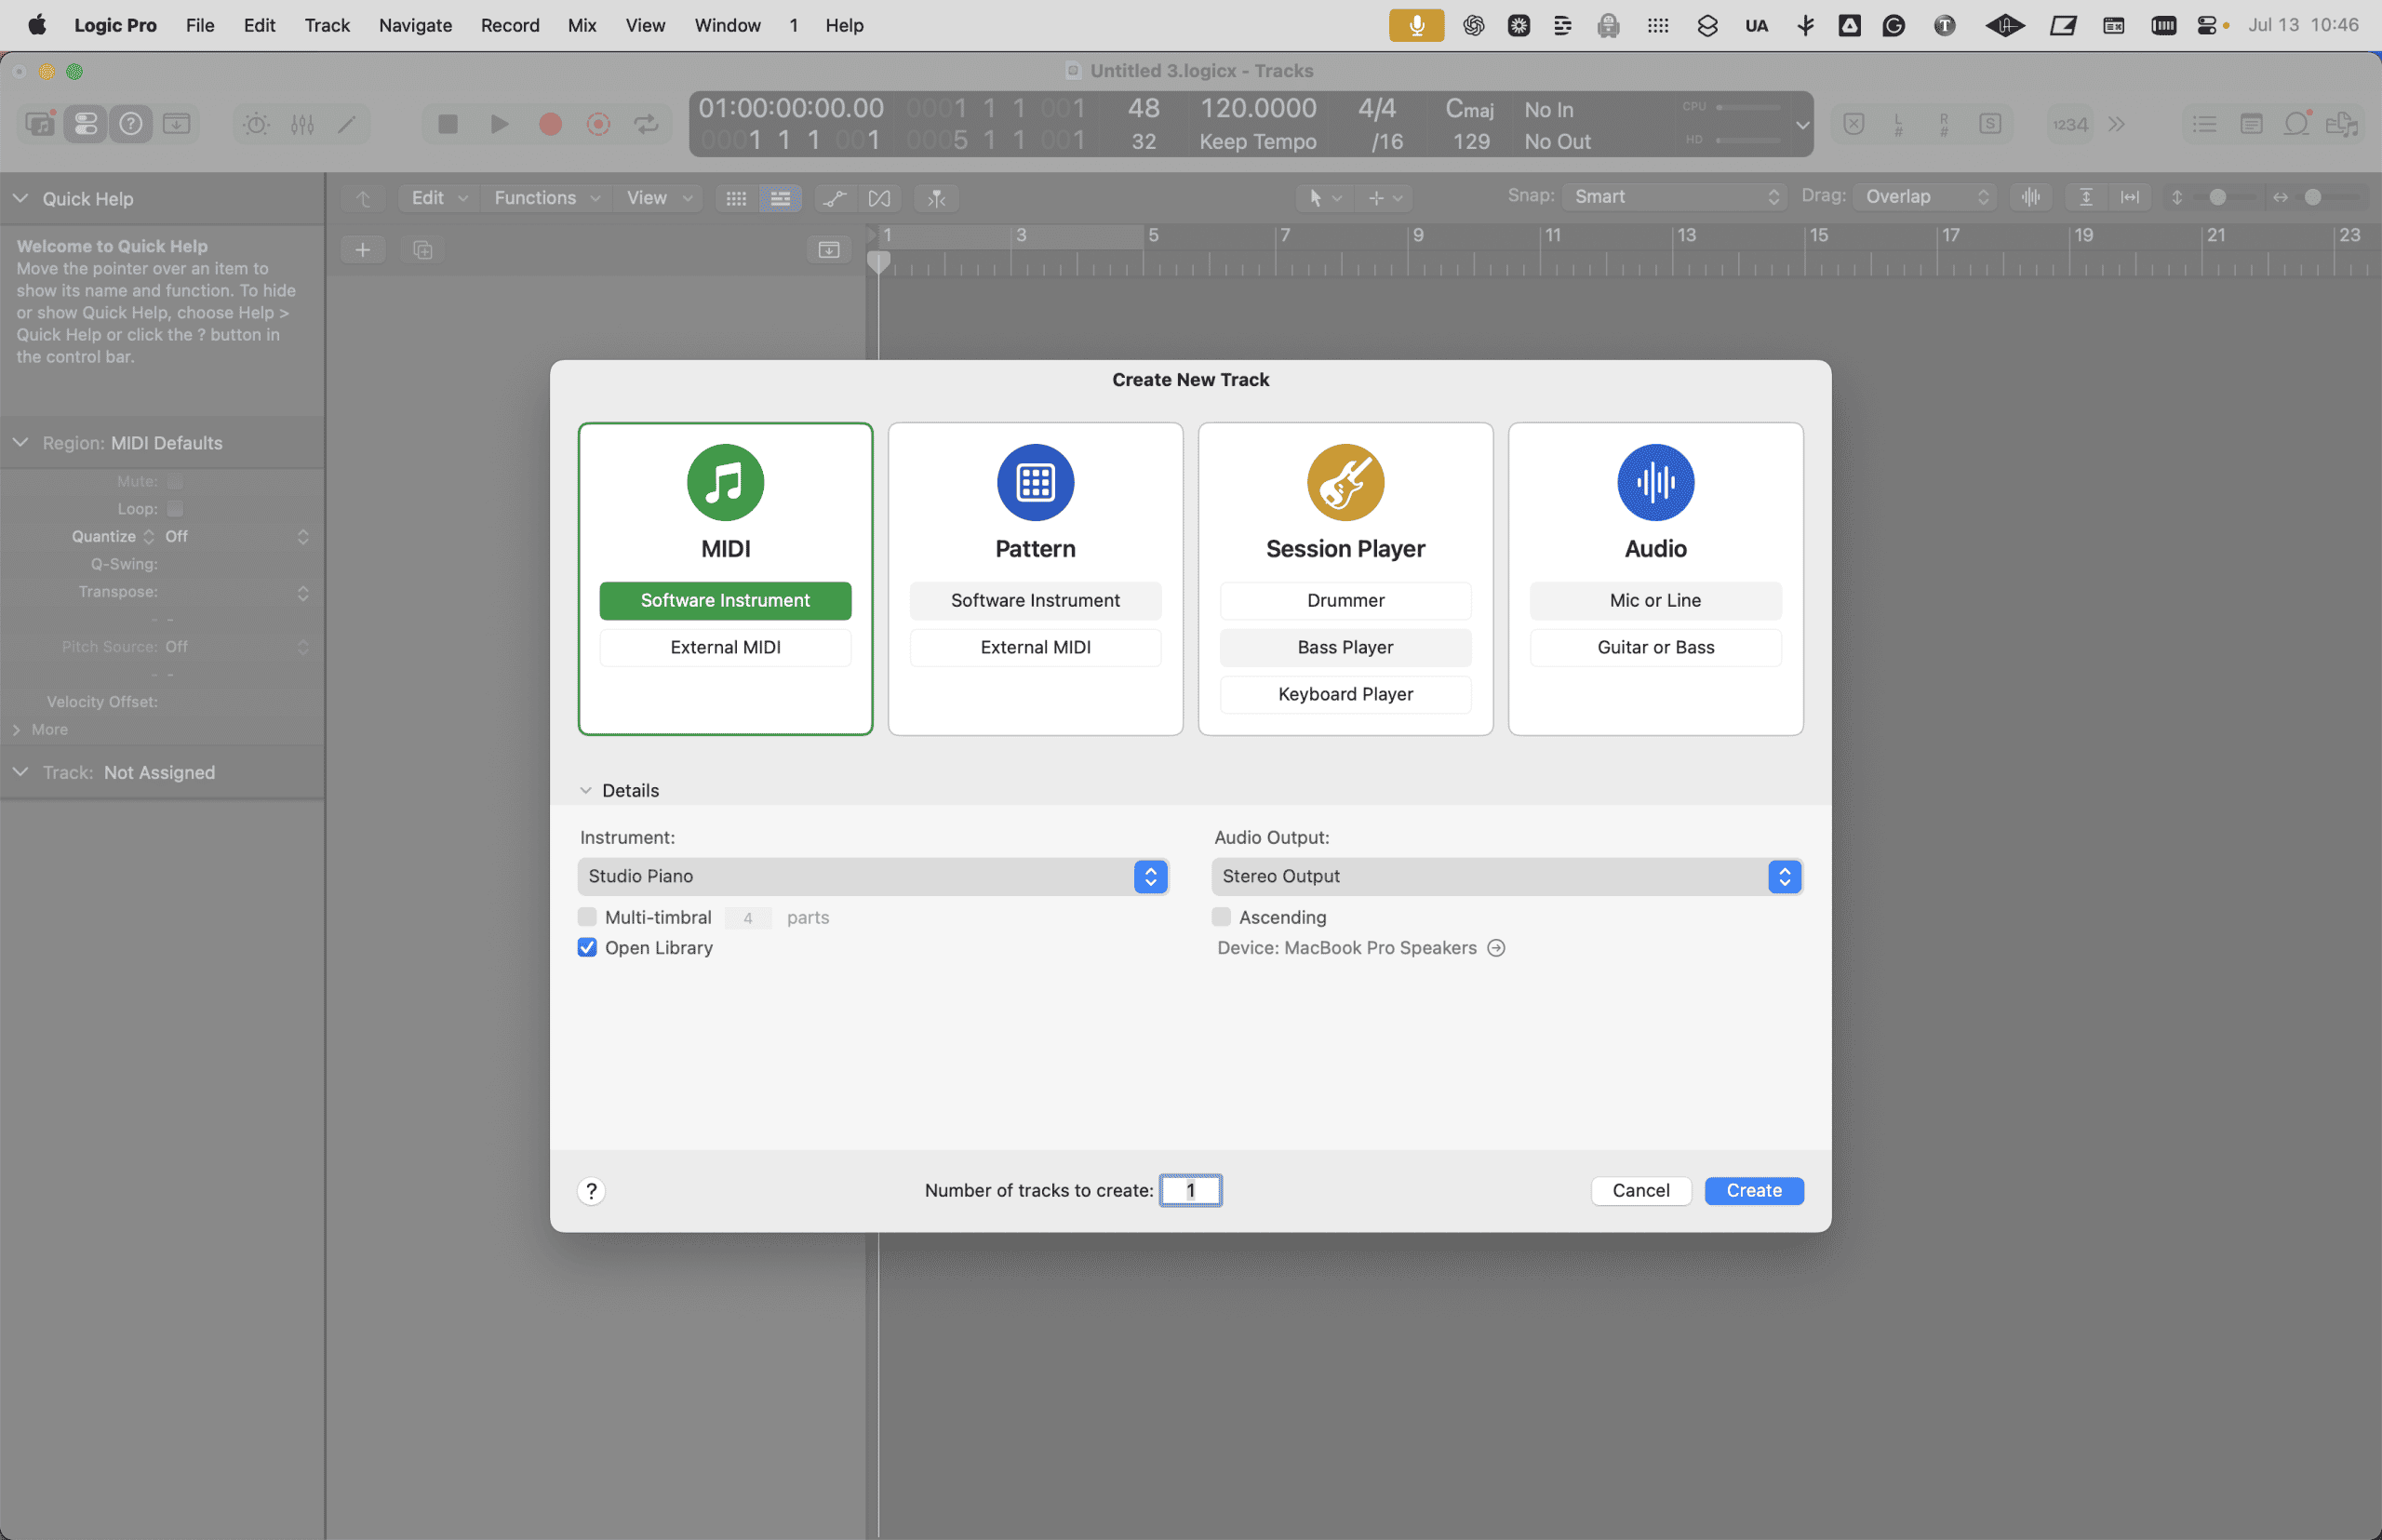
A dialog appears asking what type of track to create first. What each option does:
- Audio: for recording a microphone, guitar, bass, or any live instrument into your interface
- Software Instrument: for playing virtual instruments using a MIDI keyboard or your Mac keyboard
- Drummer: Logic Pro's AI drummer, which generates realistic drum patterns automatically
- Session Player: AI musicians (Bass Player, Keyboard Player, Synth Player) that follow your song's harmony
Choose Software Instrument if you want to explore sounds and get something happening quickly. Choose Audio if you're ready to plug in and record.
Before you record anything, set your tempo and key. Click the BPM number in the Control Bar and type your tempo. Click the key signature display (it shows the key name and major/minor) to set the key of your song. These two settings affect how Apple Loops sound when you drag them in, how Session Players perform, and how the Chord Track behaves. Five seconds now saves confusion later.
Your fastest path to a full arrangement: Session Players
Logic Pro 12 has a feature that changes everything for musicians who play a real instrument: you don't have to build your whole arrangement yourself.
Logic Pro's Session Players are AI musicians that listen to your song and play along. There's a Drummer that generates realistic patterns based on genre and feel, a Bass Player that follows your chord progression, a Keyboard Player that comps chords and fills, and the new Synth Player that creates pad layers, bass lines, and rhythmic parts.
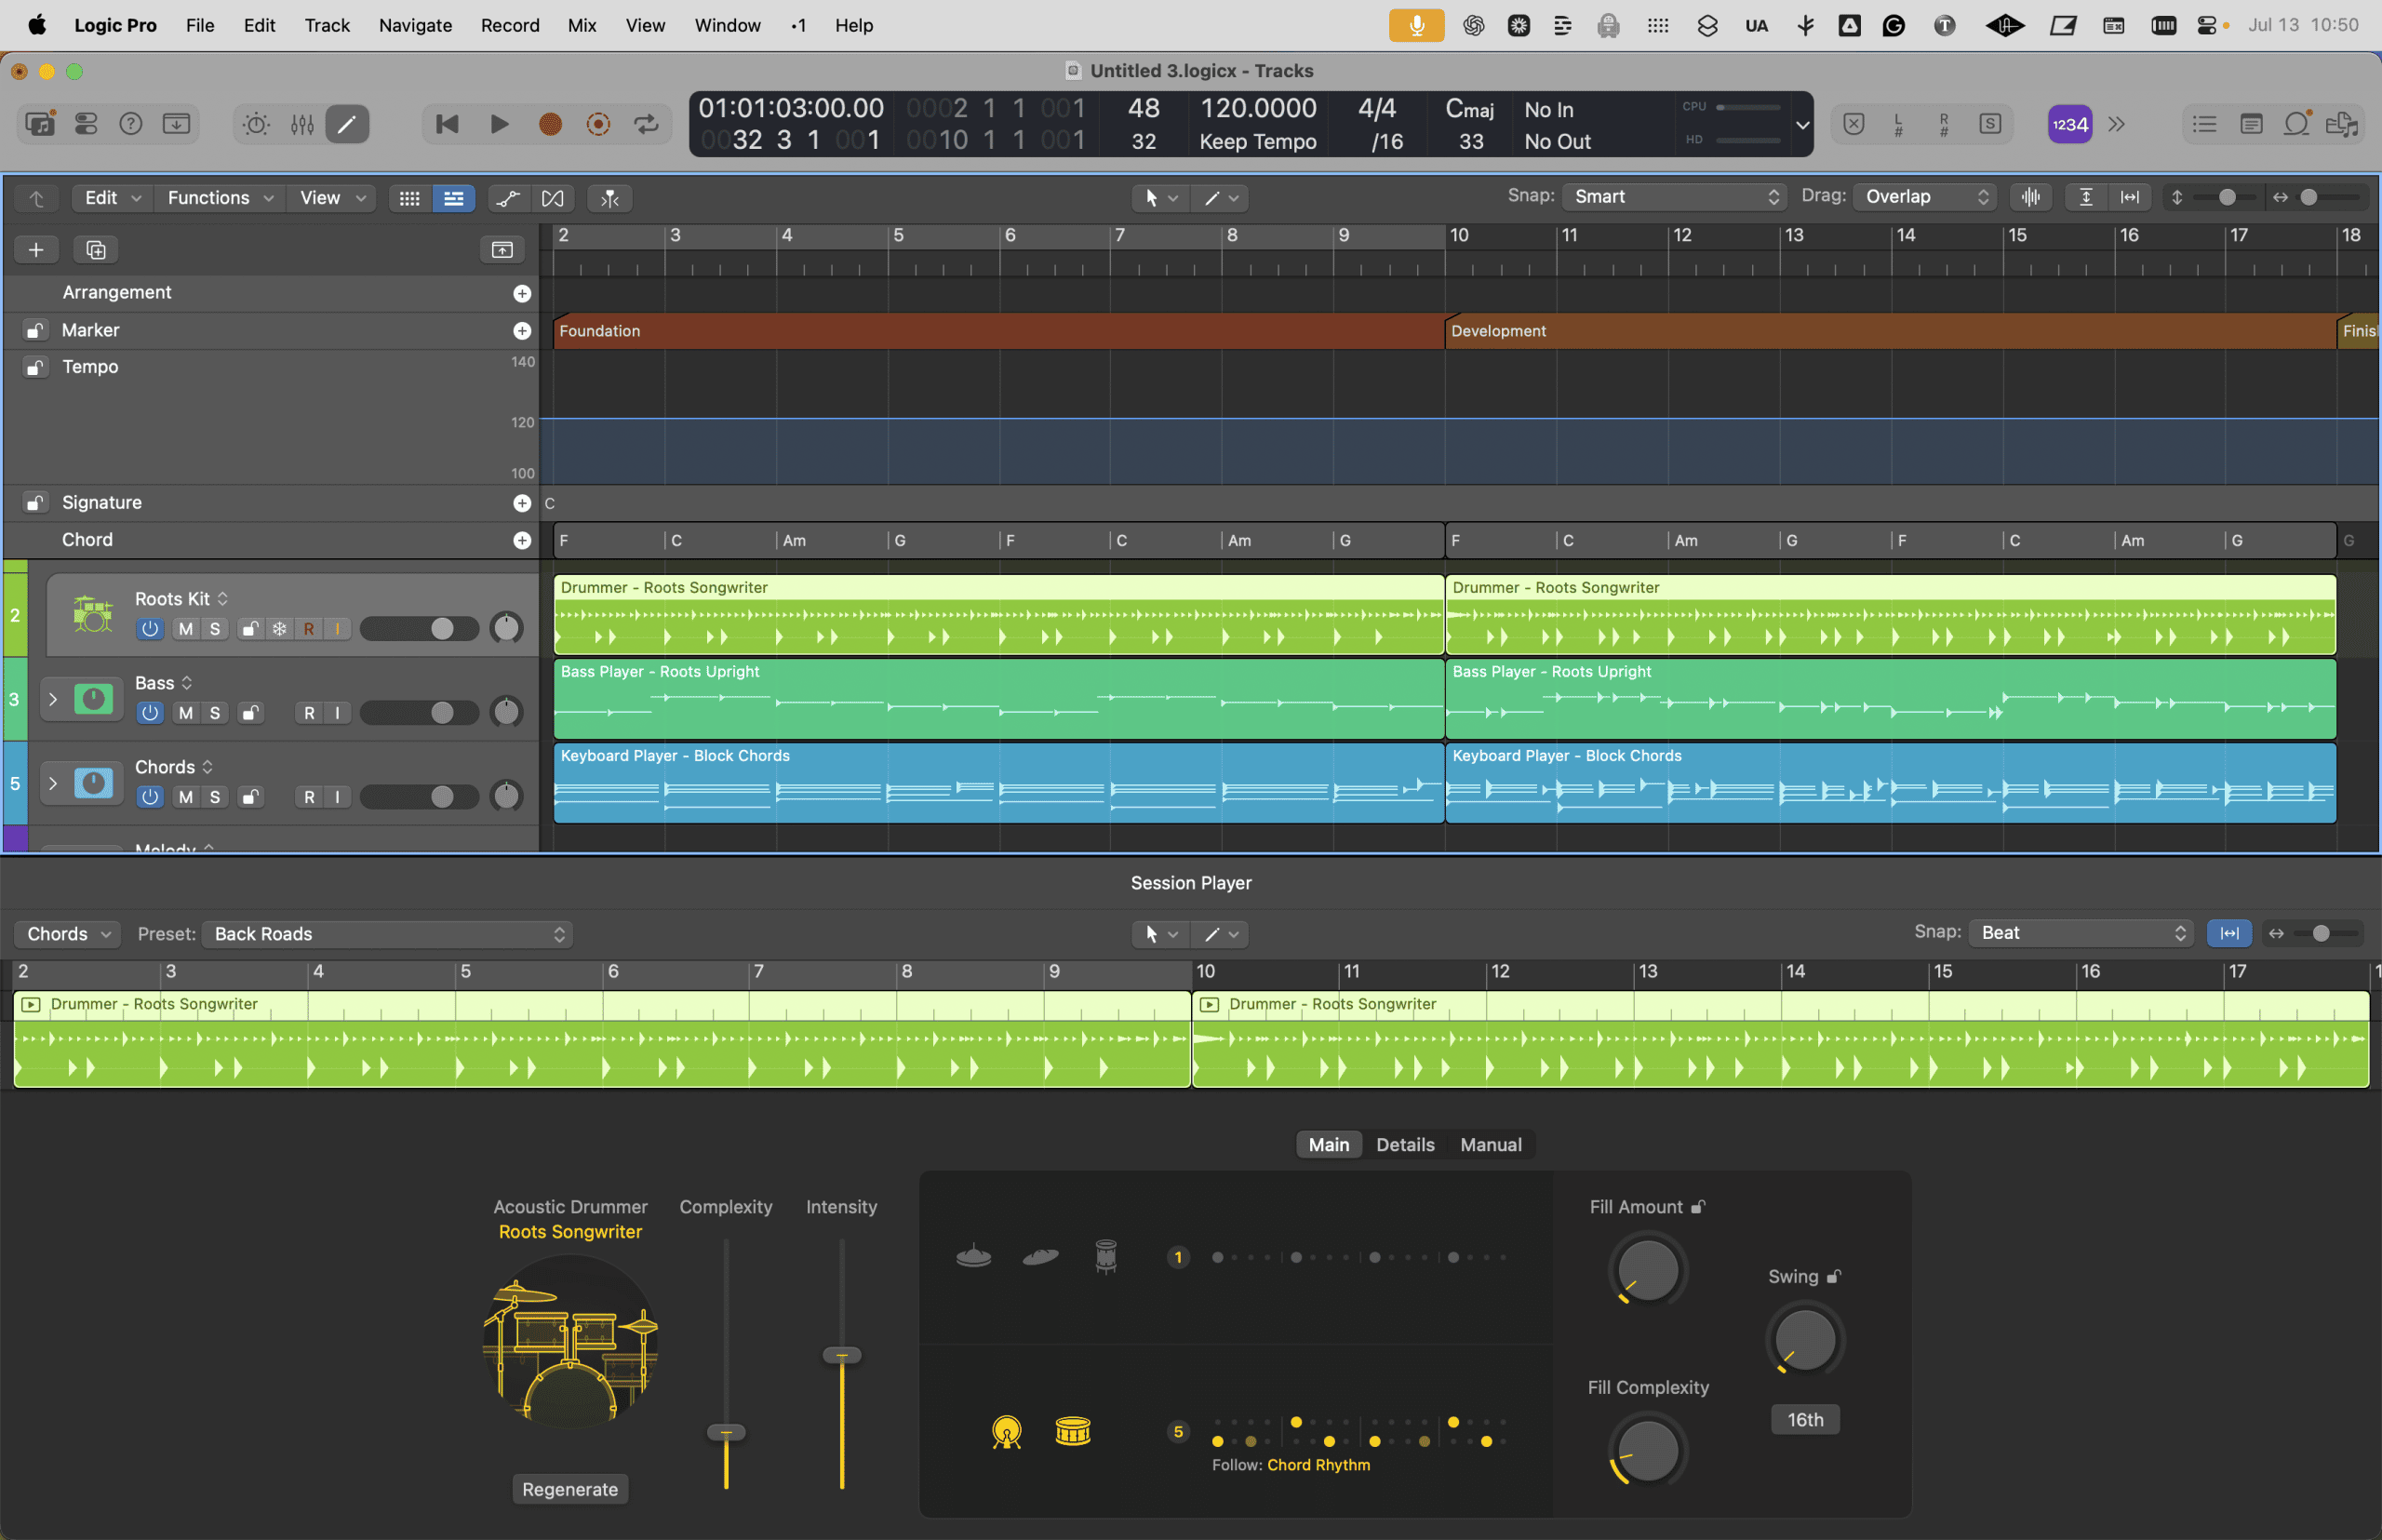
Your fastest path to a full arrangement:
- Record your guitar or piano part (or program it with a Software Instrument).
- Drag that region to the Chord Track to run Chord ID. Logic analyzes your recording and figures out the chords automatically.
- Add a Drummer track (Track > New Drummer Track). Logic generates a drum pattern immediately.
- Add a Bass Player track. Set it to Follow Global Chord Track. It plays a bass line that matches your chords.
- Add a Synth Player track for pad layers or additional texture.
In under ten minutes, you've gone from one instrument to a full rhythm section, all following the harmony of your actual recording.
For a full walkthrough of Chord ID, see How to Use Chord ID in Logic Pro 12.
Remember: Session Players are a starting point, not a finishing move. Adjust the feel, the complexity, and the instrumentation in the Session Player Editor. But for getting a song sounding full and musical fast, nothing in Logic Pro works better.
Recording audio: vocals, guitar, and live instruments
Now for the real thing: recording vocals, guitar, or any live instrument. The setup takes a few steps, so do them in this order.
Setting up to record:
- Add an Audio track (Track > New Audio Track, or click the + button above the track list).
- In the track header, set the Input selector to the correct input on your interface (usually Input 1 for a microphone or mono instrument).
- Click the Record Enable button (the R in the track header) to arm the track for recording.
- Click the Input Monitoring button (the I next to the R) to hear yourself through Logic's monitoring while you play.
- Watch the level meter in the Control Bar as you play or sing. Aim for peaks around -12 to -18 dBFS. If it's hitting the red, turn down the gain on your interface, not the fader in Logic.
Recording:
Press R to start recording. Play or sing. Press Space to stop.
Logic drops the recorded region into the Tracks area at your playhead position. Play it back immediately to check the level, the tone, and the performance.
Takes and comping:
If you record multiple takes by pressing R again without moving to a new track, Logic stacks them automatically. Click the disclosure arrow on the track header to see all your takes. You can then comp the best parts together by clicking segments from different takes. This is one of Logic Pro's most powerful workflow features for vocalists, and it's much easier than it looks once you've tried it once.
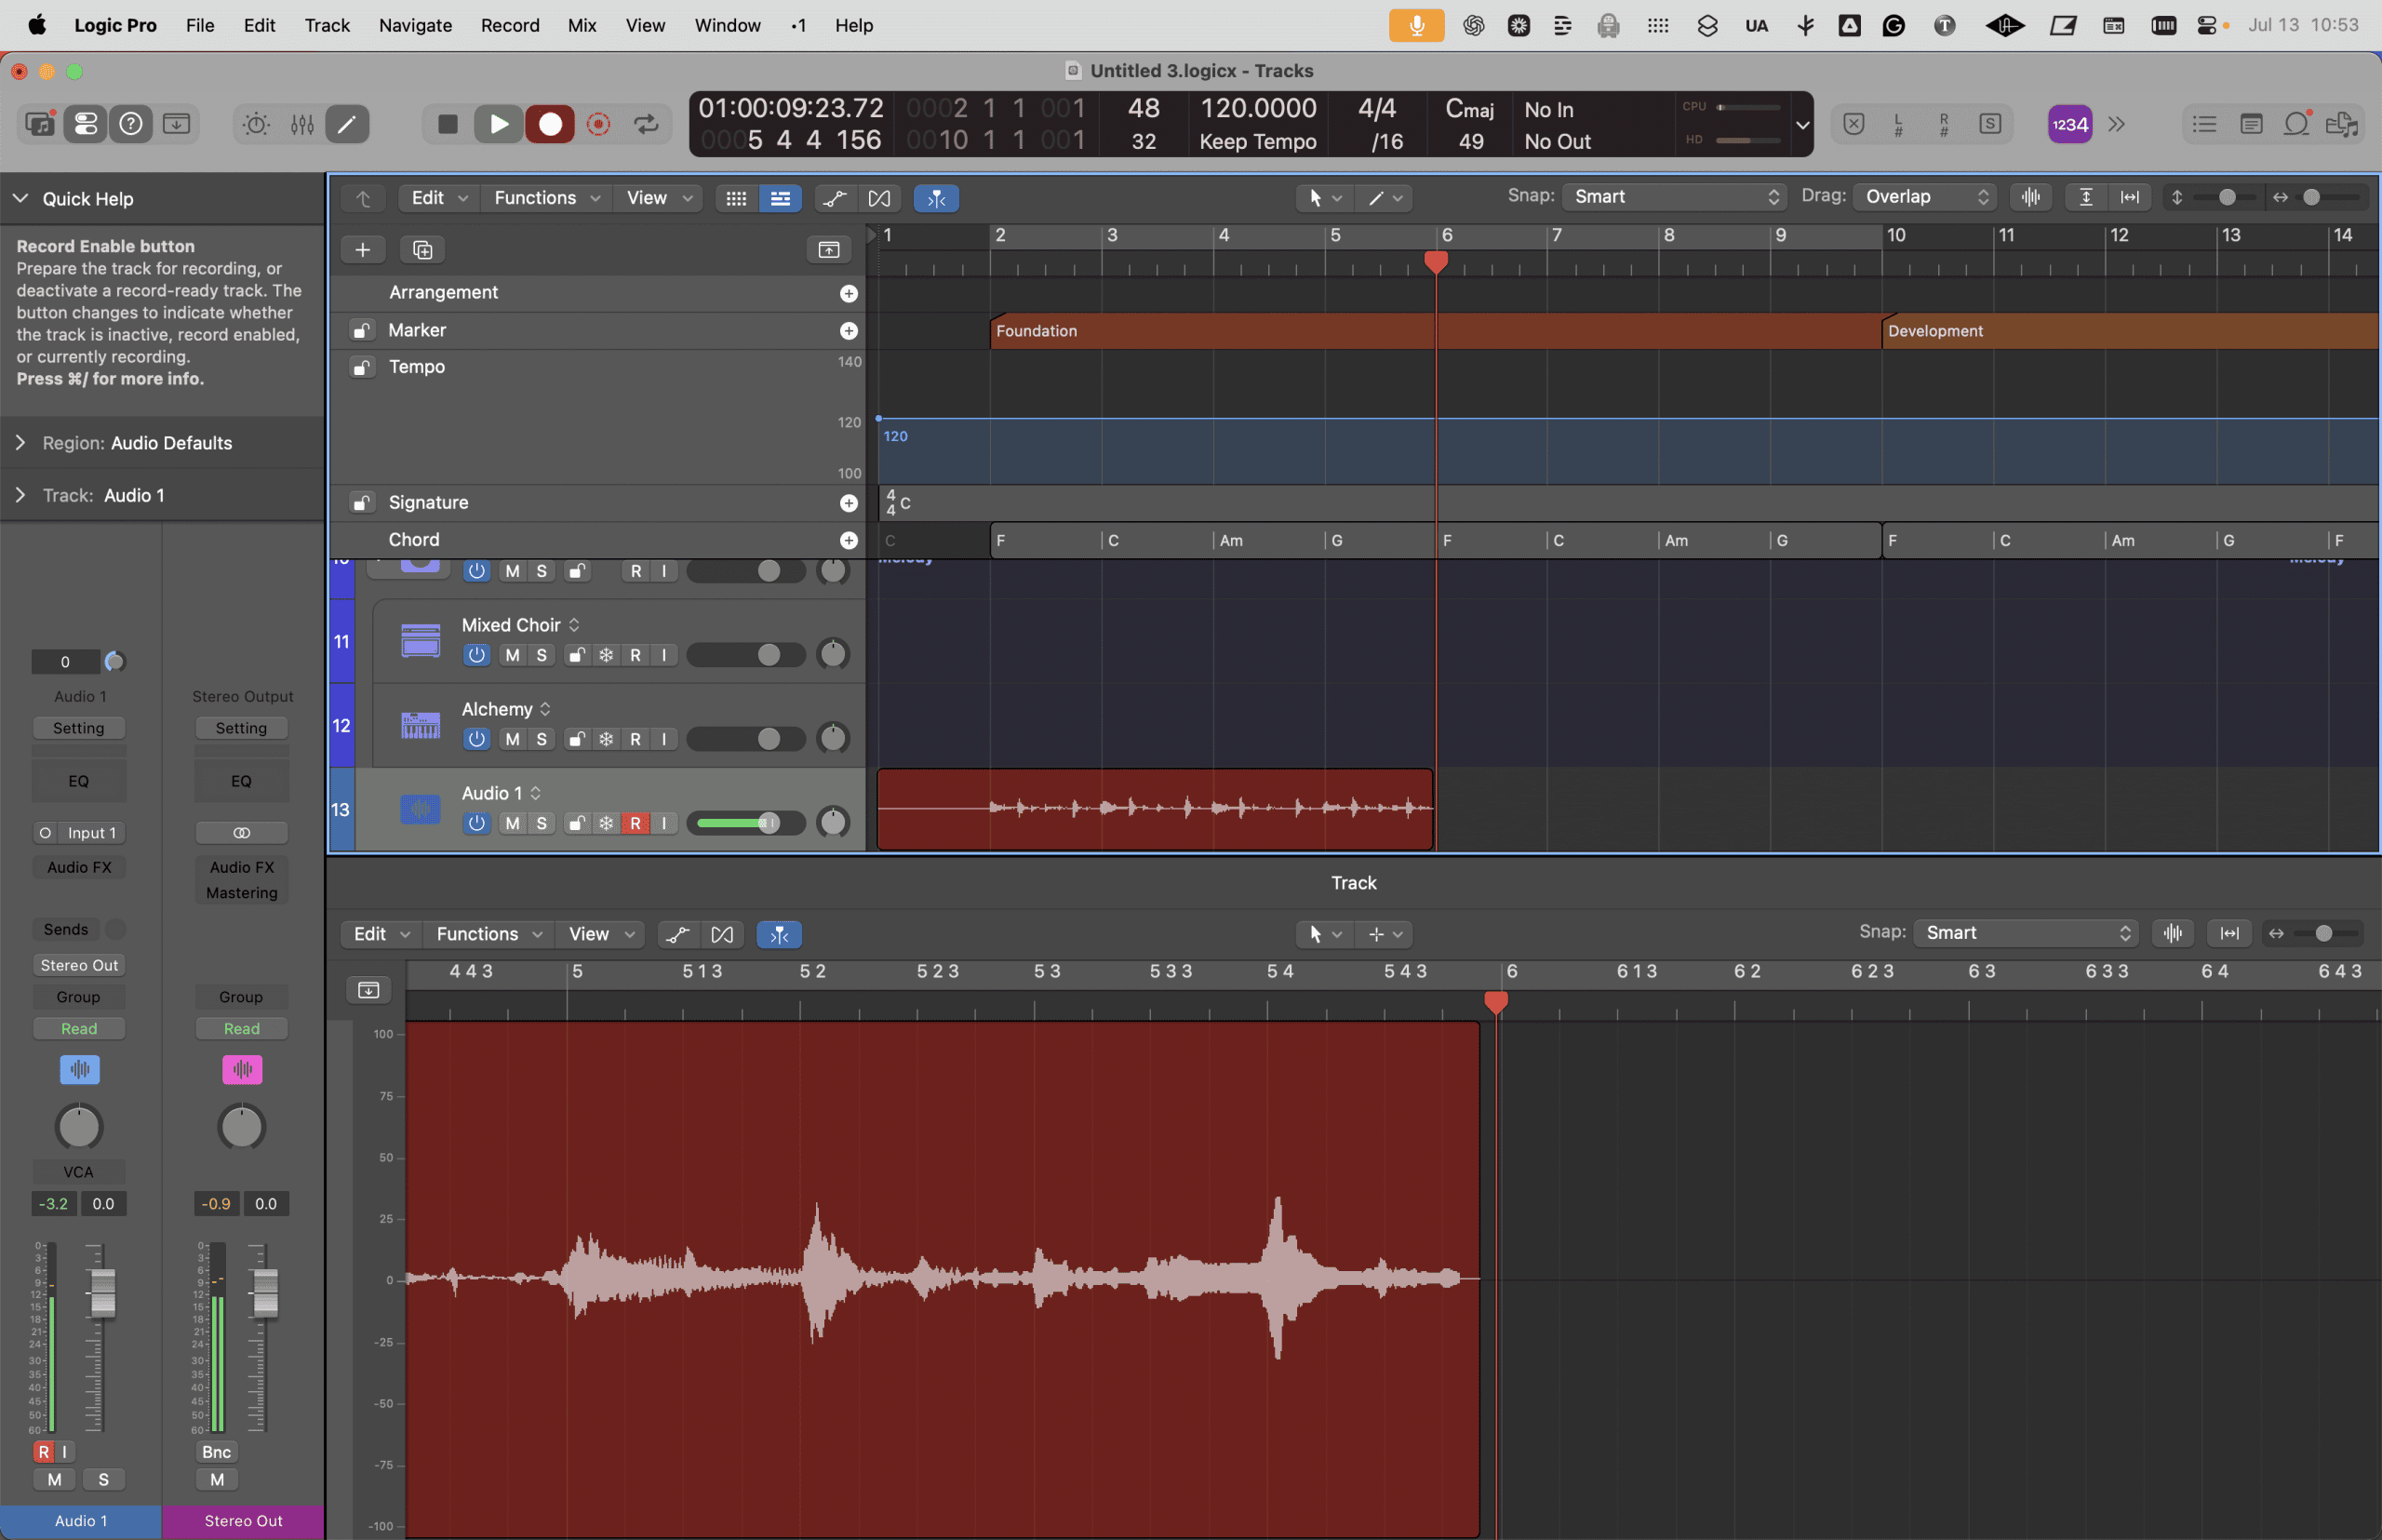
Pro tip: The best fix for a weak recording is another take. The fewer Flex Pitch corrections you need, the better the vocal will sound. For a complete guide to tuning vocals after recording, see How to Use Flex Pitch in Logic Pro.
Recording MIDI: software instruments and the Piano Roll
Software Instrument tracks record MIDI data, which is essentially a set of instructions telling Logic which notes to play, how hard, and for how long. The advantage over audio recording is total editability after the fact: you can change the notes, the timing, the velocity, and even swap the instrument entirely without re-recording.
To record a software instrument:
- Add a Software Instrument track.
- Press Y to open the Library and choose a sound. Grand Piano is a good starting point.
- If you have a MIDI keyboard connected, it's ready to play immediately.
- If you don't have a MIDI keyboard, go to Window > Show Musical Typing. Your Mac's keyboard becomes a playable instrument, with keys mapped to notes. It gets you recording right now, even if it has limits for serious playing.
- Press R to record, play your part, press Space to stop.
Editing in the Piano Roll:
Double-click the recorded MIDI region to open the Piano Roll. Each horizontal bar is a note. Drag notes left and right to shift their timing. Drag them up and down to change their pitch. Drag the right edge to adjust the note length.
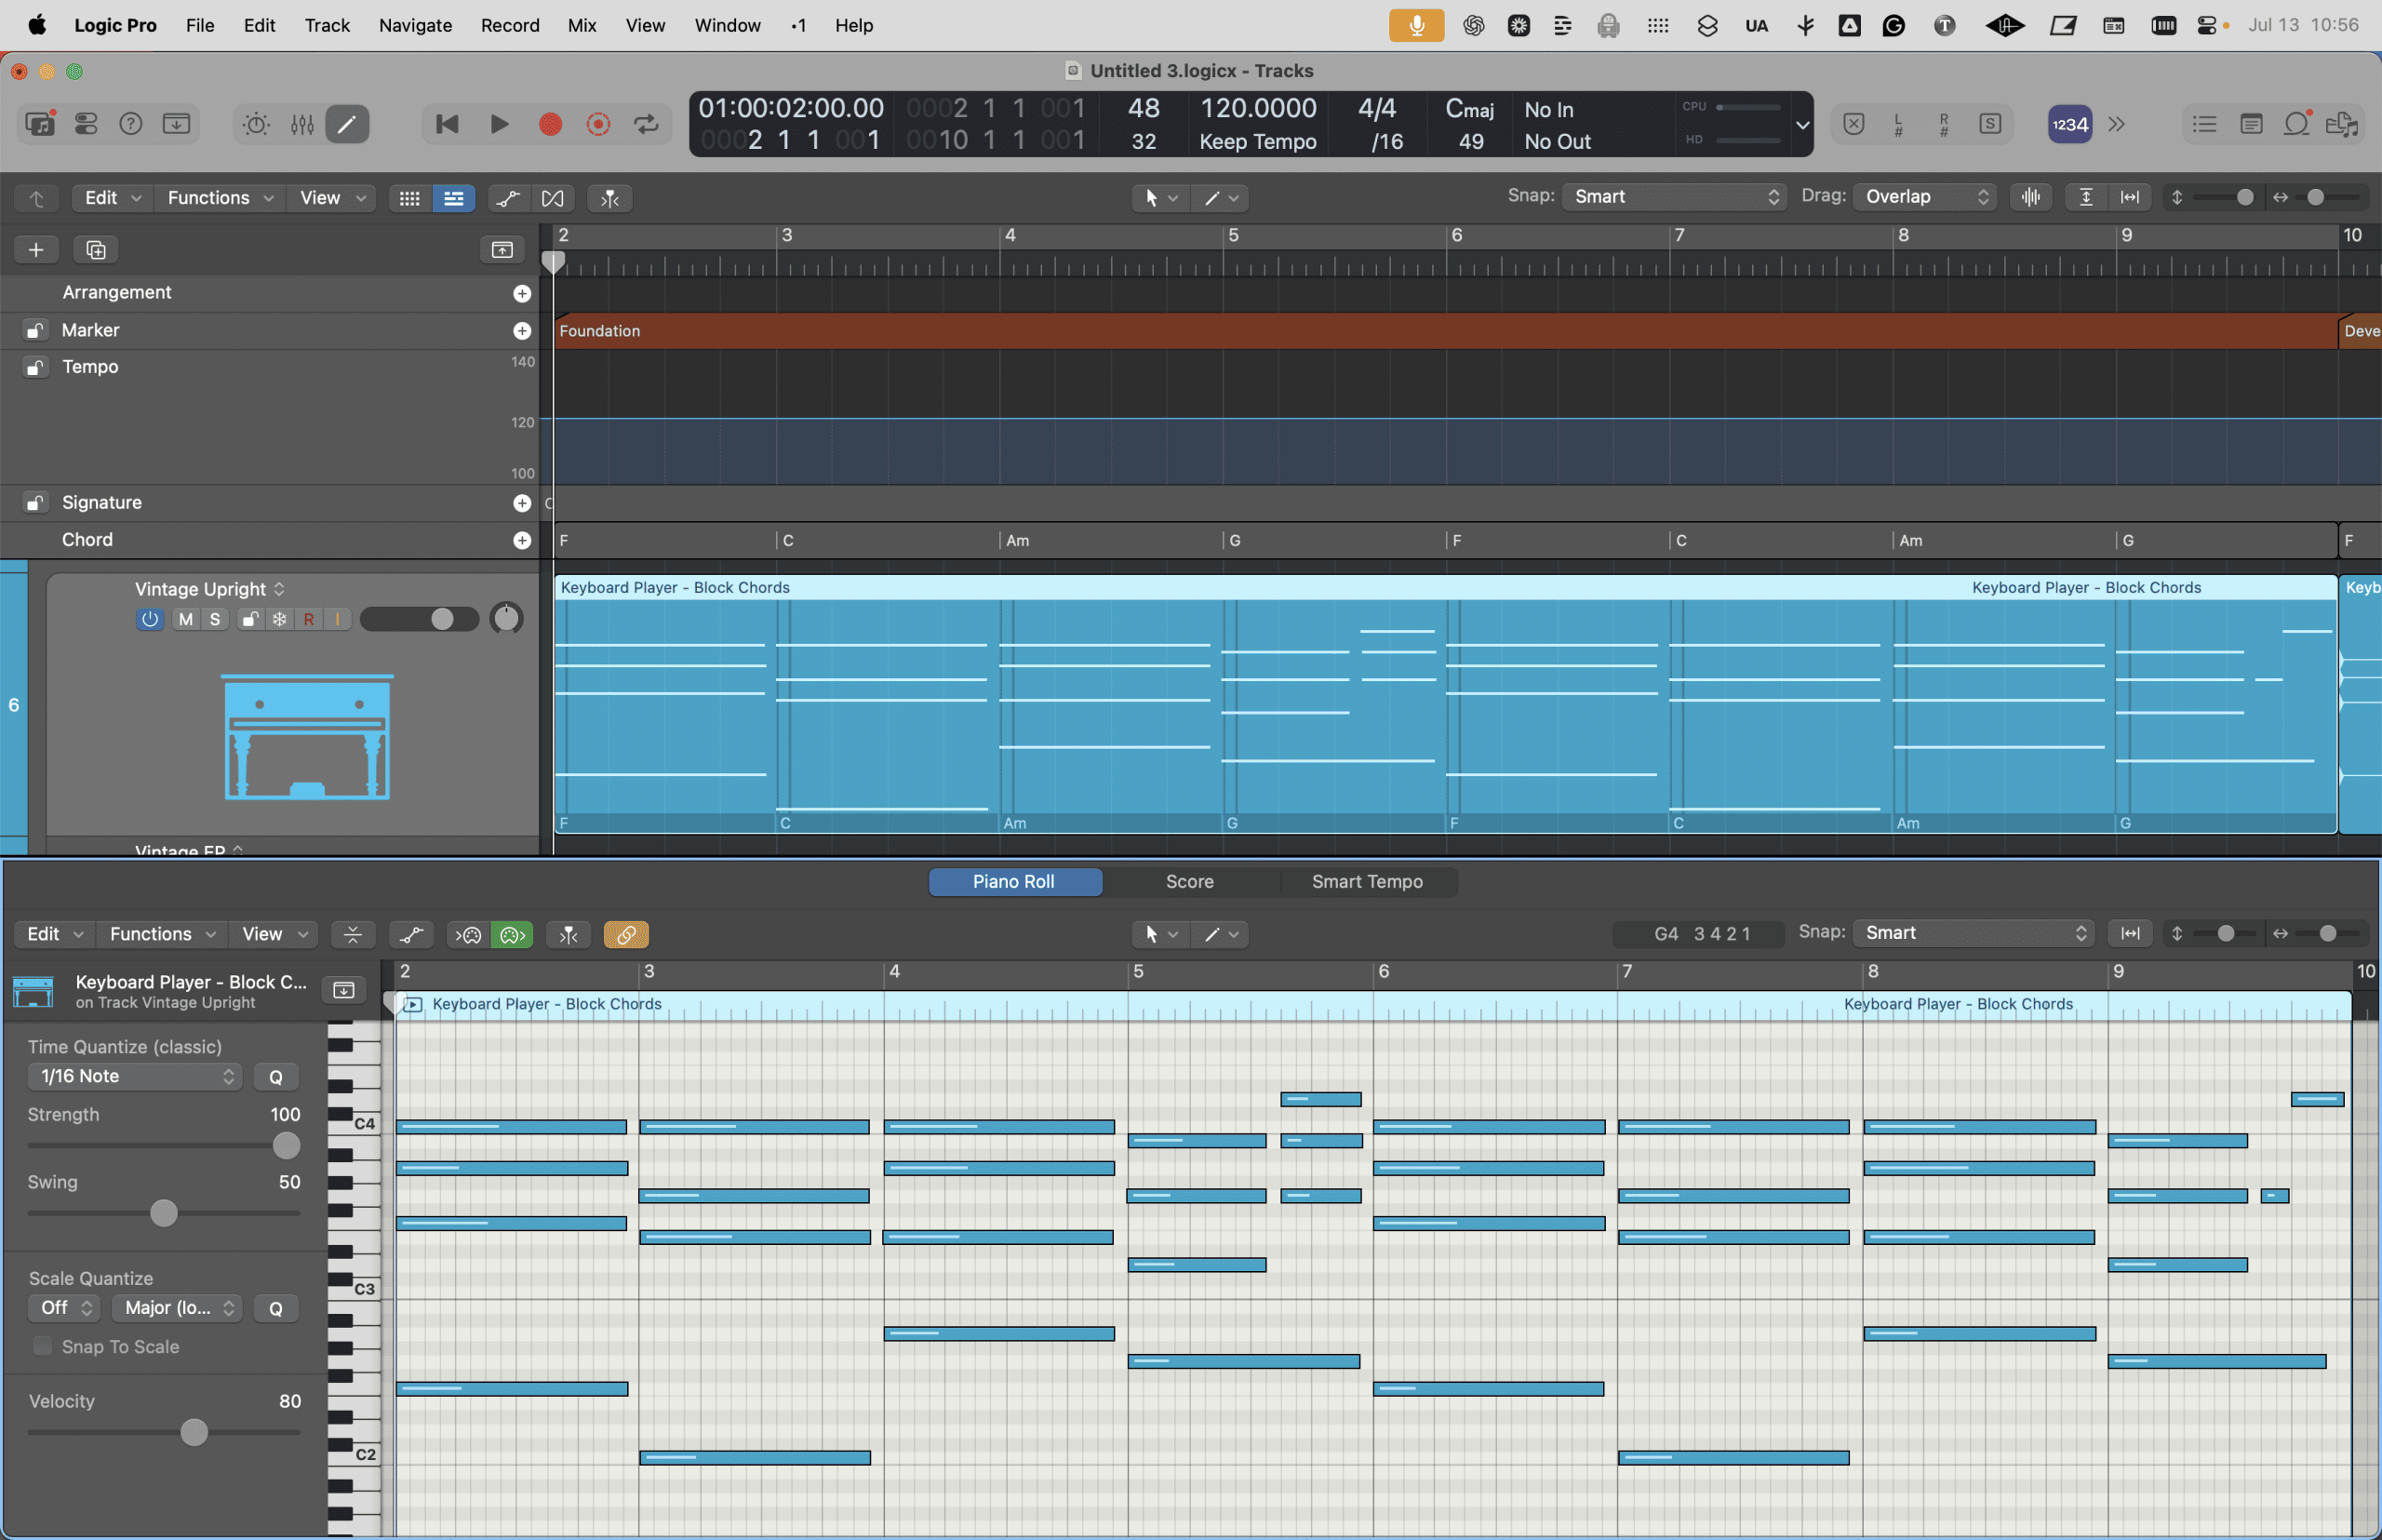
To tighten up timing without making it sound mechanical, select all the notes with Command-A, then find the Quantize menu in the Piano Roll header. Start with 1/8 note quantization and adjust from there. The Q-Strength slider controls how hard Logic snaps notes to the grid (100% = perfect grid, 50% = halfway between where you played and the grid).
Building your arrangement
Once you have a few recorded regions, it's time to build the song structure.
The Tracks area is your arrangement canvas. Here are the most useful moves for beginners:
Copy a region: Hold Option and drag a region to duplicate it. This is the fastest way to repeat a section.
Loop a region: Hover over the upper-right corner of a region until the cursor changes to a loop arrow, then drag right. The region repeats seamlessly.
Use the Arrangement Track: Right-click anywhere in the Global Tracks area at the top and make sure Arrangement is checked. This adds a row where you can define sections of your song: Intro, Verse, Chorus, Bridge. Click the + button on the Arrangement Track to add a section, then name it and drag it to the right length. Logic will use this to keep your structure organized as you build.
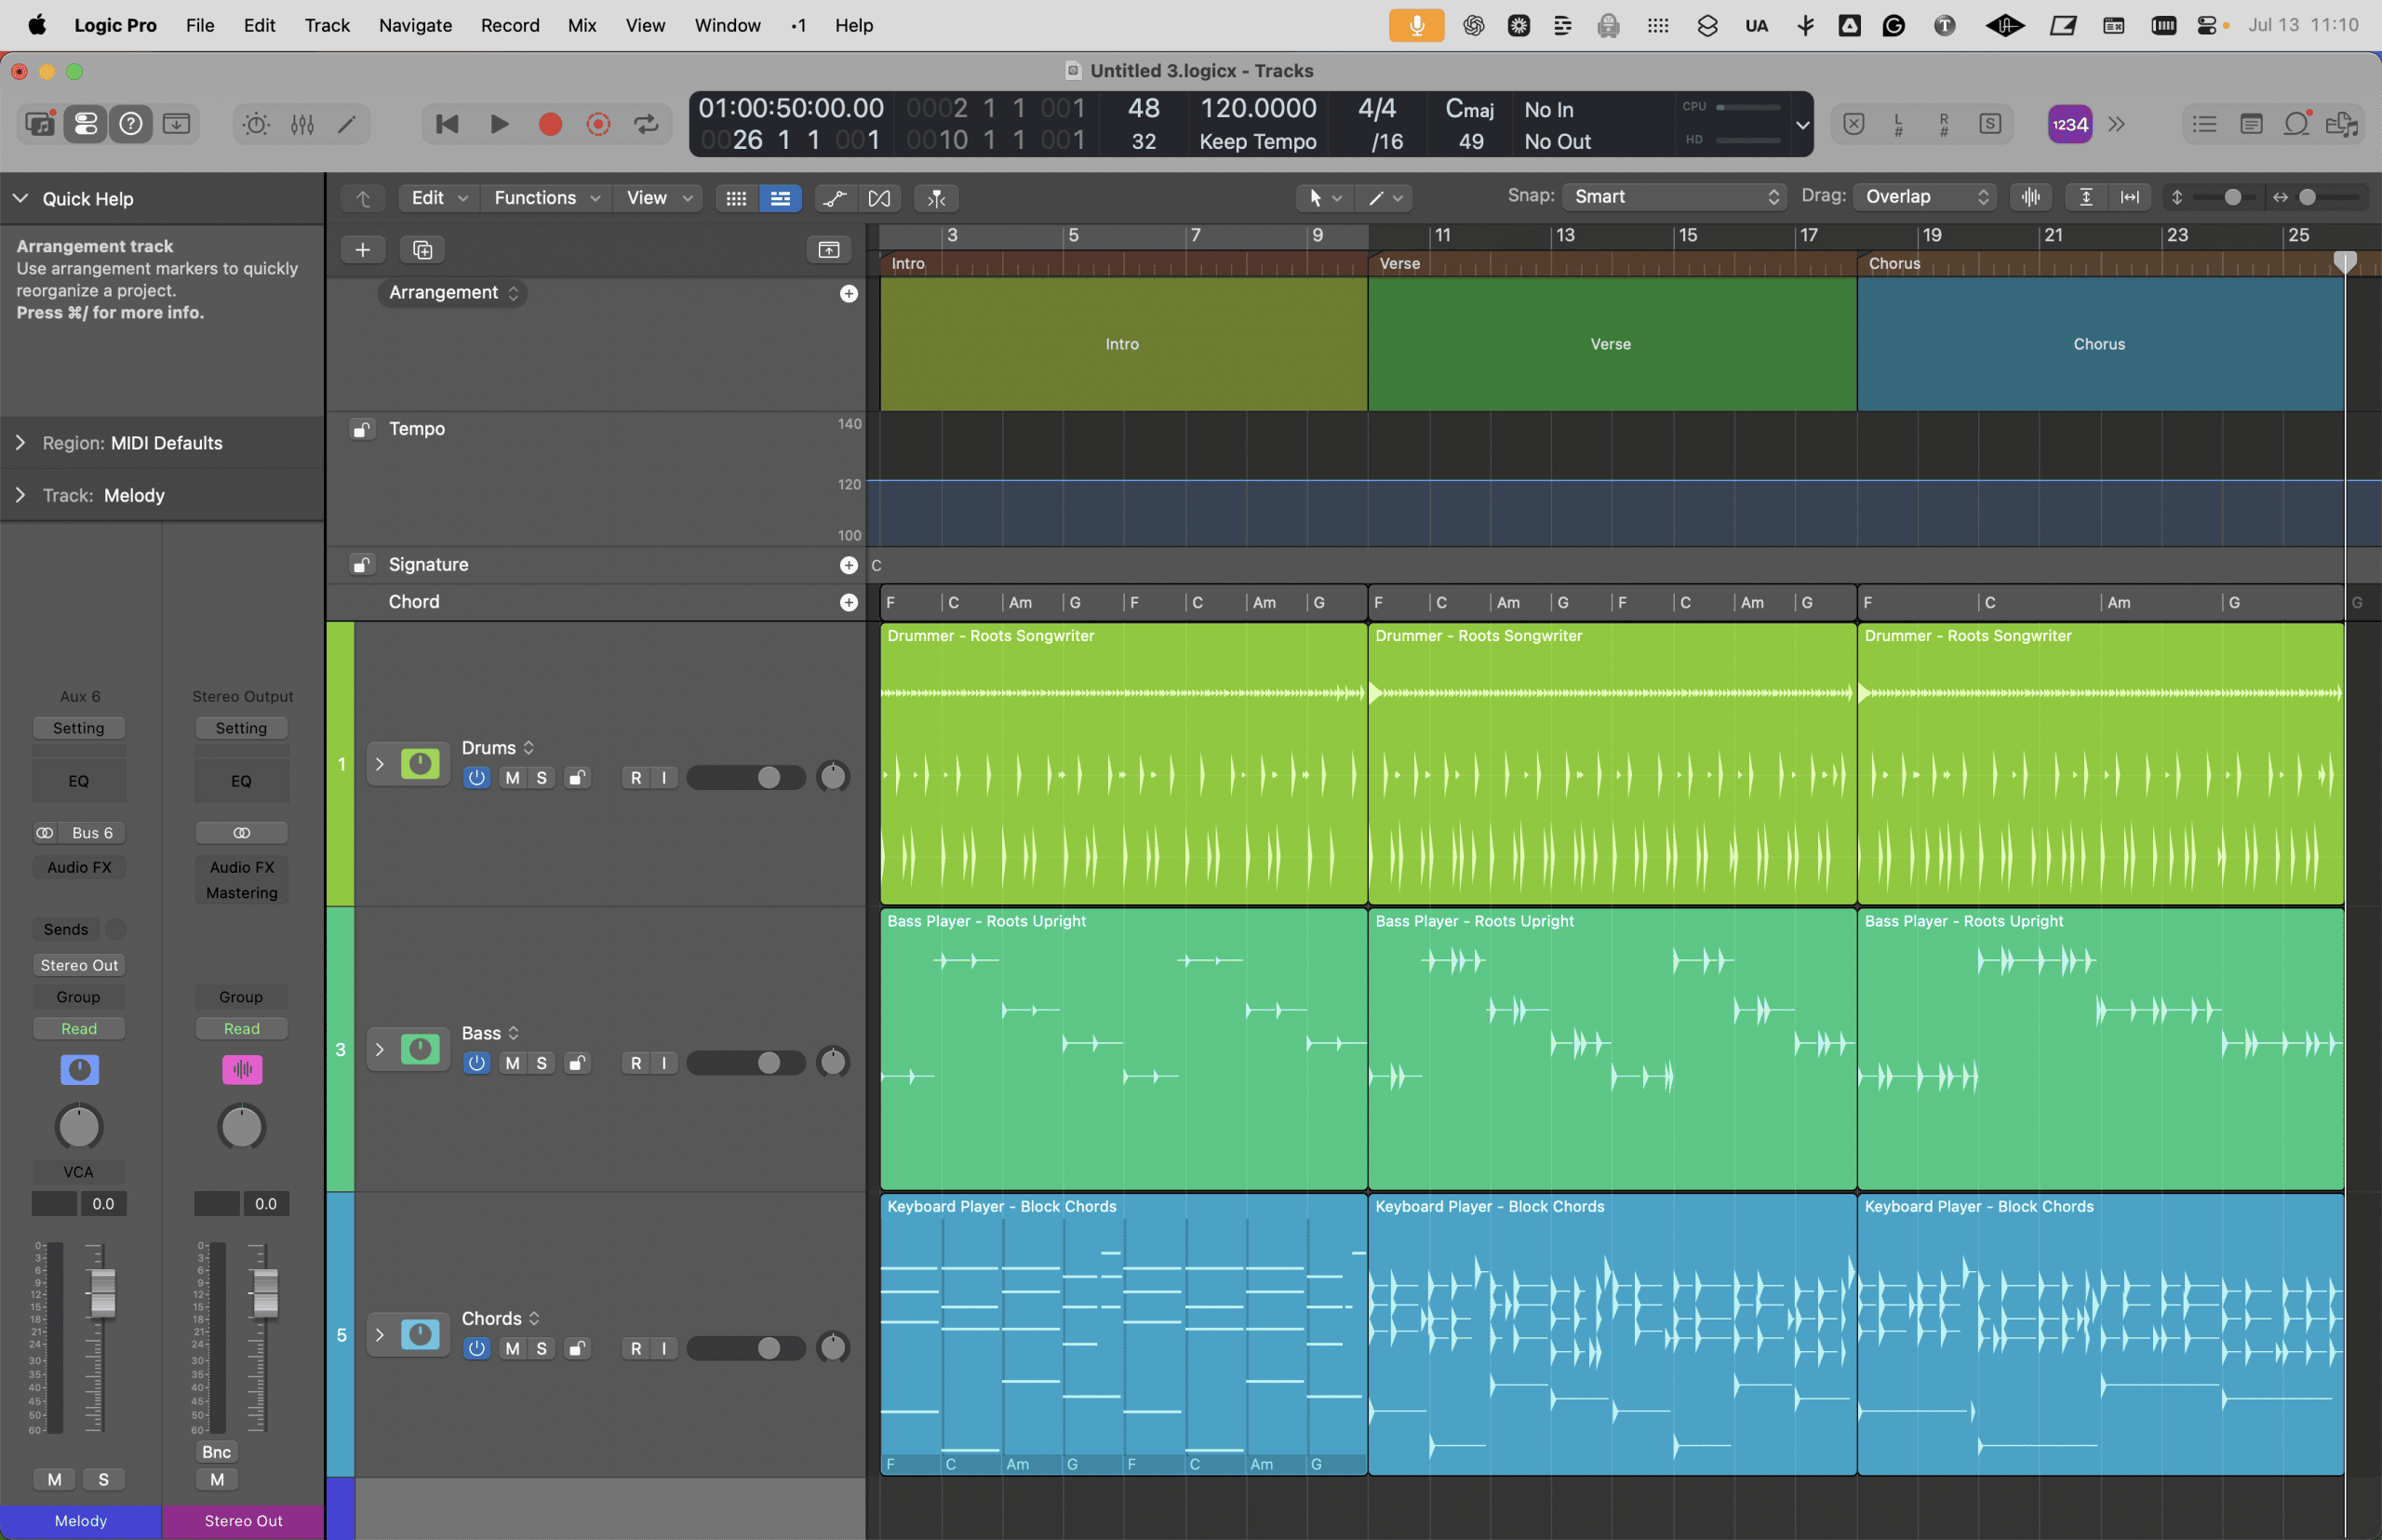
Zoom in and out: Press Command + Right Arrow to zoom in on the timeline, Command + Left Arrow to zoom out. Press Command + Up/Down Arrow to resize the track heights. Getting comfortable with zoom changes everything about how quickly you can work.
Pro tip: Build your arrangement in sections. Get a full verse working, duplicate it, adjust it into a chorus, then connect the two. Thinking in sections keeps momentum high and prevents the perfectionism spiral.
Basic mixing: get your levels right first
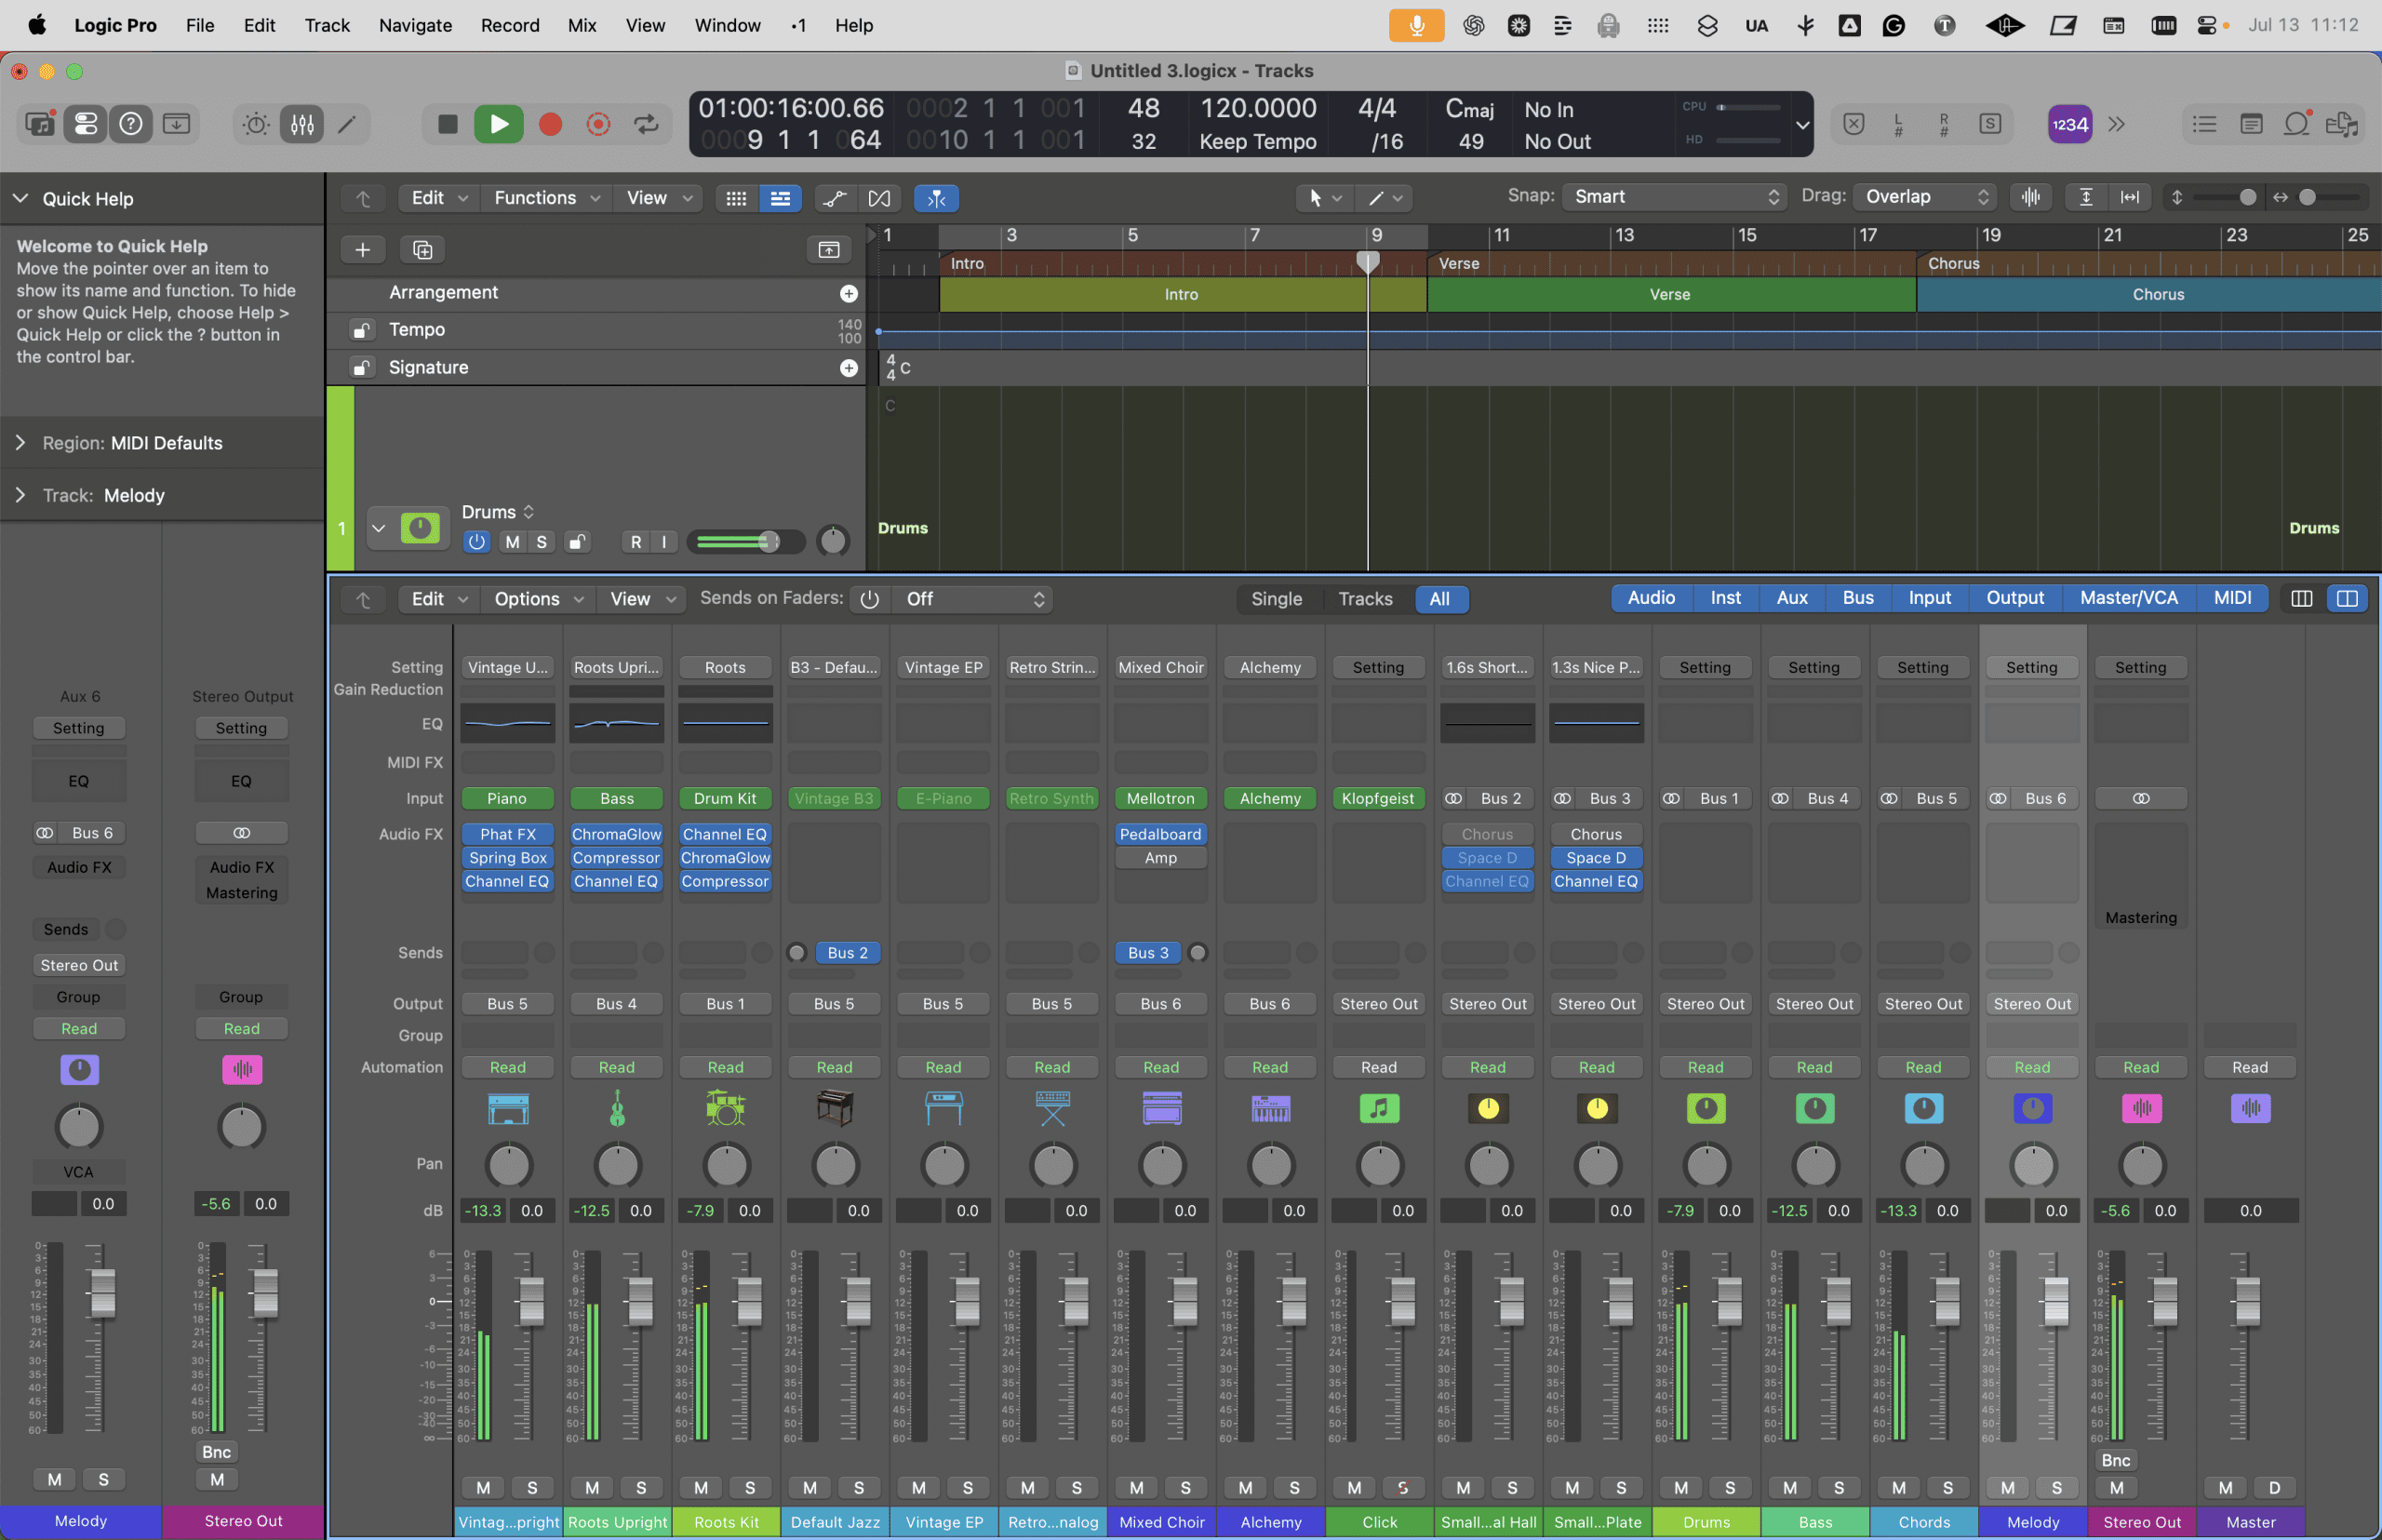
Press X to open the Mixer. You'll see a vertical channel strip for every track in your project.
Mixing is its own deep topic, and there's a full guide coming for it. But for a beginner finishing a first track, two things matter more than anything else.
Step 1: Balance your faders.
Before adding any effects, pull all your faders to a starting point and listen. The goal is for every element to be audible without any single track dominating. Vocals usually need to sit clearly on top. Drums and bass anchor the bottom. Everything else fills in around them.
There's no magic formula here. Trust your ears and adjust until the balance feels right.
Step 2: Clean up with a high-pass filter.
On every track that doesn't need low-end energy (vocals, guitars, keyboards, pads), add a Channel EQ by double-clicking the EQ slot in the channel strip, then engage the High Pass Filter (the curved shape at the far left of the EQ). Drag it up to around 80–120 Hz.
This removes the low rumble and buildup that muddies most beginner mixes without affecting anything you actually want to hear. It's the single most effective beginner mixing move in Logic Pro, and it costs nothing.
Pro tip: Reference your mix on headphones and speakers if you have both. What sounds good on one often sounds very different on the other. A mix that holds up on both is a good mix.
Exporting your finished song
When you're ready to share your track, Logic Pro's Bounce function converts your project into a single audio file.
Go to File > Bounce > Project or Section.
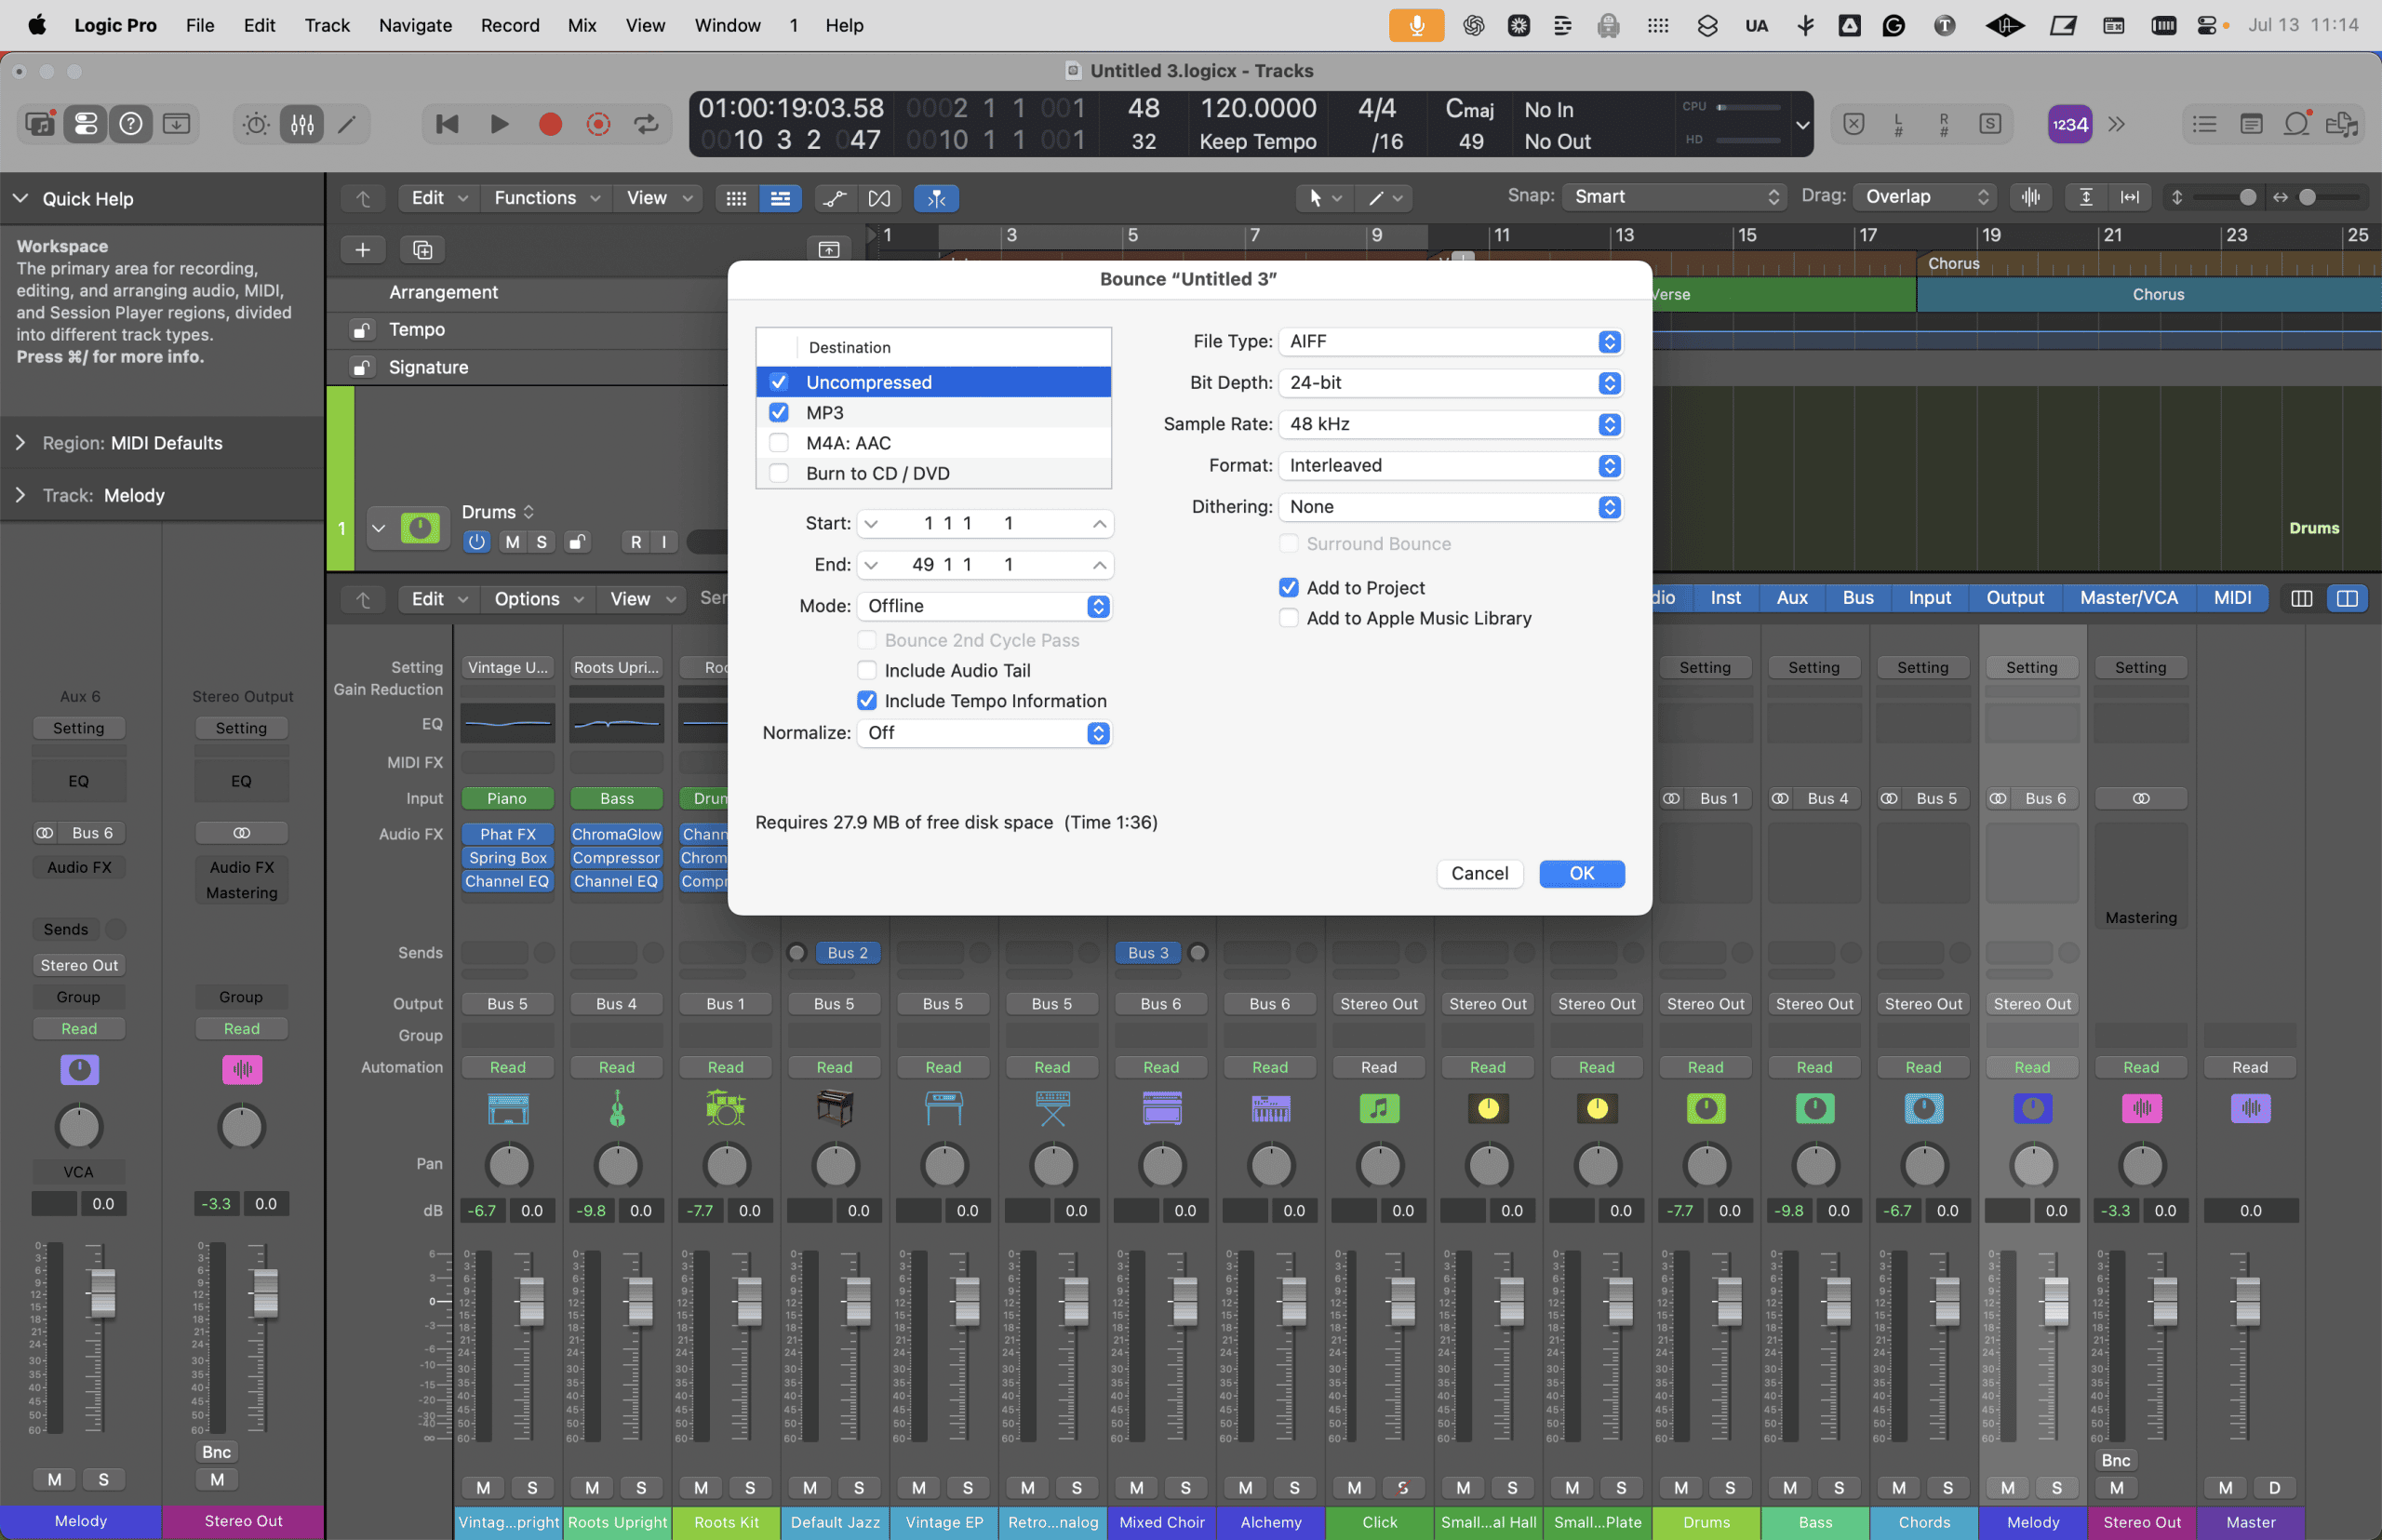
The Bounce dialog has a few settings worth knowing:
File Format:
- MP3 for sharing on streaming platforms, social media, or email
- WAV or AIFF for high-quality files (use these if you're sending to a mixing or mastering engineer)
Resolution:
- 24-bit for production-quality files
- 16-bit for CD-quality or final distribution files
Sample Rate:
- 44.1 kHz for music
- 48 kHz for video and film
Normalize:
- Leave off if you're sending the file to a mastering engineer or streaming platform (they handle levels)
- Turn on if this is your final file and you want Logic to bring the peak level up to 0 dBFS automatically
Bounce Mode:
- Offline is faster and works for most projects
- Realtime is needed if you're running external hardware that has to process in real time
Name your file, choose a destination folder, click Bounce. Logic renders the file, and that's your first finished track.
Five things that will make Logic Pro click faster
These aren't advanced techniques. They're small habits that cut the learning curve significantly.
1. Learn five keyboard shortcuts first.
R (record), Space (play/stop), Command-Z (undo), X (mixer), Y (library). Those five get you through most sessions. Add more as you naturally reach for them.
2. Save a personal template once your setup feels right.
Once you've configured your audio settings, loaded the tracks you usually start with, and got your project looking the way you like it, go to File > Save as Template. Name it "My Starting Point" or whatever makes sense. Every new project starts exactly where you want it.
3. Use the Help Tag.
Hover over any button, knob, or menu item in Logic Pro and a small label appears telling you what it does. It answers most "what does this do?" questions instantly, without leaving Logic.
4. Use the Undo History.
Edit > Undo History shows every action you've taken in the current session as a list. Click any step to return to that exact state. This is more powerful than repeated Command-Z and gives you confidence to experiment without fear.
5. You don't need to learn everything.
Logic Pro has hundreds of features. Professional producers use maybe 20% of them regularly. Focus on the workflow in this guide, make something complete, and add one new skill per project from there. That's how the learning actually sticks.
Frequently asked questions
Is Logic Pro hard to learn?
It has more depth than GarageBand, but the core recording and arranging workflow is learnable in a weekend. The interface makes sense once you know what the five main zones are for. Start with a simple project and build from there.
Do I need an audio interface?
Not to get started with software instruments and MIDI. For recording vocals, guitar, or any microphone, an audio interface is strongly recommended. Built-in Mac audio can work in a pinch, but the quality and latency are noticeably worse.
Can I use Logic Pro on iPad?
Yes. Logic Pro for iPad has the same core features with a touch-optimized interface. Projects sync between Mac and iPad via iCloud.
Does Logic Pro work with third-party plugins?
Yes. Logic Pro supports any Audio Unit (AU) plugin. Most major plugin developers build AU versions of their instruments and effects.
Can I open GarageBand projects in Logic Pro?
Yes, directly. File > Open, navigate to the GarageBand project, and Logic converts it automatically. No export or import step required.
How much does Logic Pro cost?
$199.99 as a one-time purchase from the Mac App Store. All future updates are included at no additional charge.
What's next
This guide gives you the foundation. From here, every new track you make will teach you something the guide can't.
A few natural next steps as your skills grow:
- Go deeper on Chord ID to get your Session Players responding to your actual recordings: How to Use Chord ID in Logic Pro 12
- Learn Flex Pitch to tune your vocals without leaving Logic: How to Use Flex Pitch in Logic Pro
- Build a real workflow with Logic Pro Professional Workflow, the step-by-step training system for home studio producers who want professional-sounding results faster: Logic Pro Professional Workflow
Music should be fun, not frustrating. Logic Pro is a remarkable tool once you stop trying to understand all of it and start using the parts that matter. Start with one track. Finish it. Then start the next one.
You've got this.
Your Logic Pro Coach,
Graham