
New to Logic Pro 12? Before diving in, get up to speed with everything that changed in the update: Logic Pro 12: Harmonic Intelligence, Chord ID, and a Smarter Creative Core.
You recorded a guitar riff. Or maybe you laid down a piano sketch at 2am and it actually sounded good.
The problem? The rest of Logic has no idea what chords are in it. Your Session Players are guessing. Your Synth Player is doing its own thing. Your arrangement feels like a bunch of musicians who never got the lead sheet.
That’s exactly the problem Chord ID was built to solve.
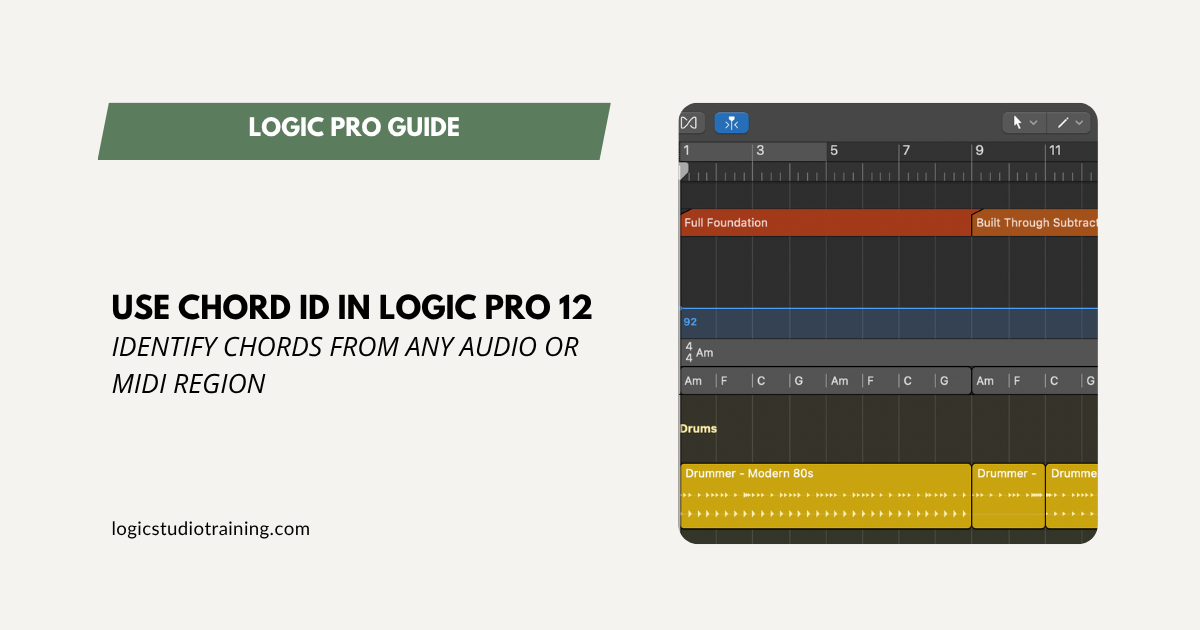
Introduced in Logic Pro 12, Chord ID analyzes the harmonic content of any audio or MIDI region and writes those chords directly to your project’s Chord Track. Once that’s done, your Session Players (including the new Synth Player) follow those chords in real time. The whole project snaps into the same key and groove, without you manually entering a single chord symbol.
In this tutorial, you’ll learn how to use Chord ID from start to finish: how to set up the Chord Track, analyze your regions, fix errors, and get your Session Players responding to your actual music.
Let’s get you making music, not just learning software.
What is Chord ID (and why does it matter)?
Chord ID is Logic Pro’s harmonic analysis engine. Point it at an audio recording or a MIDI region, and it reads the notes, figures out the chords, and logs them on the Chord Track, including when the chords change, not just what they are.
Think of it like a lead sheet, generated automatically. Once that lead sheet exists, every Session Player in your project can read it and perform in harmony with what you’ve already recorded.
Before Logic Pro 12, you had to enter chords manually onto the Chord Track, which meant either knowing your theory cold or hunting around by ear. Chord ID removes that step entirely. You play something real, Logic figures out what it is, and your whole arrangement follows along.
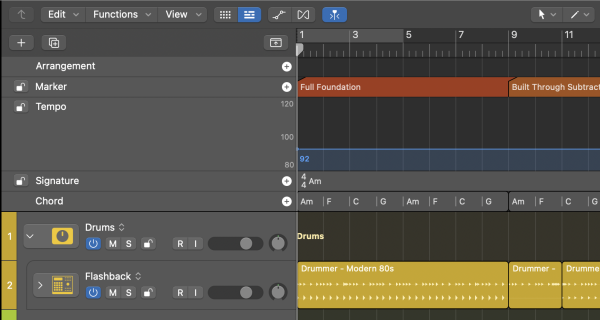
Before you start: show the Chord Track
Here’s the step that trips up almost everyone the first time. The Chord Track isn’t visible by default in every project. Before you can use Chord ID, you need to make sure you can see it.
- In Logic Pro, look above your track headers for the Global Tracks area. If it’s not visible, click the Global Tracks button (it looks like a small grid icon) in the upper-left corner of the Tracks area.
- If you can see the Global Tracks area but there’s no Chord row, Control-click anywhere in that area and choose Configure Global Tracks from the menu.
- In the dialog that appears, make sure Chord is checked. Click OK.
You should now see a Chord Track running across the top of your project. It will be empty for now, and that’s fine. That’s what Chord ID is about to fill in.
Remember: the Chord Track only needs to be set up once per project. After that, it’s always there waiting.
Method 1: Drag and drop (the fast way)
This is the quickest way to get started, and the approach most home studio producers will use day to day.
- Make sure your Chord Track is visible (see above).
- Find the audio or MIDI region you want to analyze. This could be a guitar recording, a piano part, a MIDI chord loop, anything with harmonic content.
- Click and drag that region upward into the Chord Track area.
- Logic analyzes the region and places chord markers on the Chord Track at the same timeline positions as the original region.
- Your region stays in its original place on the tracks below. You’ve just given Logic a copy of its harmonic information.
If you drag multiple regions at once, Logic analyzes each one and adds a separate chord group to the Chord Track for each region. This is useful for analyzing verse and chorus regions independently.
Pro tip: You don’t have to drag your best, cleanest region. Even a rough scratch recording works well. Chord ID is more forgiving than you’d expect. More on that in the “when things go wrong” section below.
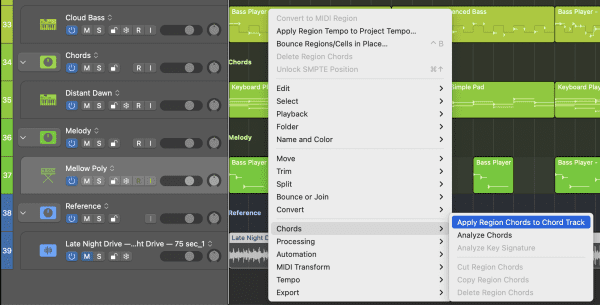
Method 2: Analyze chords using the shortcut menu
Sometimes your regions are exactly where they need to be on the timeline, and you don’t want to drag them anywhere. No problem. You can analyze chords in place using the shortcut menu. This method takes two steps instead of one, so read carefully.
Step 1: Analyze the chords in the region
- Select the region (or regions) you want to analyze in the Tracks area.
- Control-click one of the selected regions.
- From the shortcut menu, choose Chords > Analyze Chords.
Logic reads the region and stores the chord information inside the region itself. This is called the region’s “region chords.” At this point, the Chord Track is still empty, the analysis is sitting in the region, waiting.
Step 2: Push the chords to the Chord Track
- Control-click the same region again.
- Choose Chords > Apply Region Chords to Chord Track.
Now the chords move from the region up to the Chord Track, where Session Players can see and respond to them.
Remember: these are two separate commands. Analyze first, then apply. A lot of people run Step 1, notice nothing changed on the Chord Track, and assume it didn’t work. It worked, but you just need Step 2.
How to make Session Players follow your chords
Once you’ve added chords to the Chord Track, your Bass Player and Keyboard Player can use them automatically.
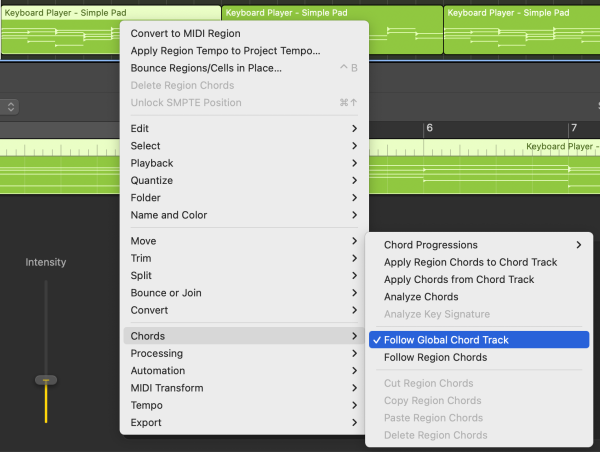
To choose whether a Session Player region follows the global Chord Track or its own region chords:
- Right-click the Session Player region in the Tracks area.
- Choose Chords.
- Select one of the following:
- Follow Global Chord Track
- Follow Region Chords
What these options mean
- Follow Global Chord Track
The region follows the song’s main chord progression from the Chord Track. - Follow Region Chords
The region follows chords stored inside that specific region instead.
When to use each one
Use Follow Global Chord Track when you want multiple Session Players (like Bass Player and Keyboard Player) to stay harmonically locked to the same progression.
Use Follow Region Chords when you want one region to play something different from the rest of the song.
Important note
This applies to the harmonic Session Players:
- Bass Player
- Keyboard Player
Drummer does not follow chord harmony in the same way.
The Synth Player and Bass Player: one setting that can throw you off
This section might save you 45 minutes of confused troubleshooting.
When you create a new Synth Player or Bass Player region, Logic can load it with a default chord progression instead of leaving it empty and ready to follow your song’s harmony.
That can make it seem like the player is ignoring your Chord Track, when really, the region may already contain its own chord data.
What’s really going on
Bass Player and Keyboard Player can follow either:
- the global Chord Track, or
- region chords stored inside that specific region
And if a region already contains its own chords, it may follow those instead.
The fix
There are two things to check:
1. Make sure the region is following the Chord Track
- Right-click the Session Player region in the Tracks area.
- Choose Chords.
- Select Follow Global Chord Track.
That tells the region to use your project’s main chord progression.
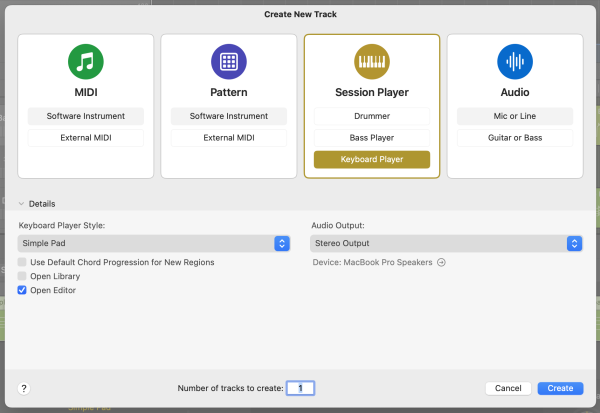
2. Stop new regions from loading a default progression
When you create a new Session Player track, look in the New Tracks dialog.
If you don’t want Logic to preload a built-in progression:
- Open Track > New Tracks (or add a new Session Player track).
- Open the Details section if needed.
- Turn off Use Default Chord Progression for New Regions.
- Create the track.
That way, new Bass Player or Keyboard Player regions are less likely to confuse you by arriving with their own harmony already baked in.
Important note
This applies to:
- Bass Player
- Keyboard Player, including Synth Player styles like:
- Simple Pad
- Modulated Pad
- Rhythmic Chords
- Sequenced Bass
- Pump Bass
- 808 Bass
What to do when Chord ID gets it wrong
Let’s be honest: Chord ID is impressive, but it’s not a perfect music theory professor. Dense recordings with lots of instruments playing at once can confuse the analysis. A single guitar or piano part? It’s usually spot-on. A full arrangement of layered tracks? Results may vary.
The good news is that fixing errors is fast.
To edit a chord on the Chord Track:
- Double-click the chord marker you want to change on the Chord Track.
- A chord editor opens. Use it to select the correct root note, chord quality (major, minor, dominant, etc.), and any extensions.
- Click elsewhere to confirm.
The rest of your chords stay exactly as they are. You’re only editing the one you clicked. Go through the Chord Track from left to right, fix anything that sounds off, and you’re done.
Pro tip: Play the project back while looking at the Chord Track. Your ear will catch wrong chords faster than your eyes will. When something sounds wrong, stop, double-click the marker, and fix it.
Bonus: analyze the key signature from your chords
Here’s a feature that almost nobody talks about, but it’s genuinely useful, especially if you’re working with notation, or if you want Logic’s MIDI display and quantization to match the key of your song.
Once you have chords on the Chord Track, Logic can analyze them to determine the key signature and write it to the Signature Track automatically.
To analyze the key signature from Chord Track chords:
- Select a series of contiguous chords on the Chord Track. You can select individual chord markers or grouped chords.
- Control-click the selected chords.
- Choose Analyze Key Signature from the shortcut menu.
Logic analyzes the selected chords, determines the most likely key, and adds a key signature event to the Signature Track.
To analyze the key signature from a Session Player region:
- Select the Session Player region in the Tracks area.
- Control-click the region, then choose Chords > Analyze Key Signature.
Either way, Logic writes the result to the Signature Track. If no key signature change existed before the last selected chord, the project’s initial key signature is updated. If one already existed, a new key signature change event is added at the start of your selection.
This is especially handy if you started a project without knowing what key you were in, which, honestly, happens to all of us.
Common mistakes with Chord ID (and how to avoid them)
Mistake 1: The Chord Track isn’t visible.
You try to drag a region upward and nothing happens. Check that Global Tracks are showing and the Chord Track is configured. It won’t appear automatically unless you’ve enabled it.
Mistake 2: Analyzed chords aren’t showing on the Chord Track.
You used the shortcut menu, ran Analyze Chords, and the Chord Track is still empty. Remember: “Analyze Chords” stores chords in the region. You still need “Apply Region Chords to Chord Track” to move them up.
Mistake 3: Synth Player is ignoring the Chord Track.
This is the most common one. You’ve done everything right, but the Synth Player is playing its own progression. Go to the Session Player Editor and untick “Use Default Chord Progression for New Regions.” This setting overrides the Chord Track until you turn it off.
Mistake 4: Accidentally moving your region while dragging it to the Chord Track.
When you drag a region upward, hold steady and go straight up. If you move it sideways even slightly, you’ll shift its position on the timeline. If that happens, Command-Z to undo and try again.
Mistake 5: Analyzing a layered bus instead of a single instrument.
For the best results, analyze one instrument at a time: your guitar, your piano, your melodic synth. Dense polyphonic recordings with multiple instruments happening at once will produce less accurate chord detection.
Frequently asked questions
Does Chord ID work on audio recordings, or only MIDI?
Both. You can analyze a recorded guitar take, a vocal melody, or any MIDI region. Audio analysis is one of the things that makes Chord ID genuinely new. Earlier Logic chord tools only worked with MIDI.
Does Chord ID work in real time as I play?
No. Chord ID analyzes a recorded region on command (via drag-and-drop or the shortcut menu). It’s not a live pitch tracker. Record your part first, then run the analysis.
Does Chord ID work on Logic Pro for iPad?
Yes. The workflow is nearly identical. Tap the Global Tracks button, show the Chord Track, drag or tap to analyze. The same “Use Default Chord Progression” gotcha applies on iPad too.
Can Synth Player drive third-party plugins through Chord Track?
Yes. The Synth Player can be used to control third-party plugins and external hardware synths. Once it’s following the Chord Track, the harmonic information passes through regardless of what instrument is loaded.
What if I want a Session Player to follow different chords from the rest of the project?
Set that Session Player’s Pitch Source to “Region Chords” instead of “Chord Track.” You can then add region-specific chords to that player’s regions without affecting the rest of the project. This is useful when you want, for example, the bass to walk through a different set of extensions than the keyboard.
Putting it all together
Here’s the full Chord ID workflow in a single quick-reference list:
- Open Global Tracks and show the Chord Track
- Drag an audio or MIDI region to the Chord Track (or use Analyze Chords from the shortcut menu, then Apply Region Chords to Chord Track)
- Review the detected chords and fix any errors by double-clicking chord markers
- Confirm that Bass Player and Keyboard Player regions are set to Follow Global Chord Track by right-clicking the region in the Tracks area.
- For Synth Player: untick “Use Default Chord Progression for New Regions”
- Optionally, analyze the key signature (Control-click selected chords > Analyze Key Signature)
- Press Play and listen
That’s the whole system. One recorded riff, one Chord Track, and suddenly your entire arrangement knows what key it’s in.
Don’t worry if the first pass isn’t perfect. Fix a chord, press Play, keep moving. The goal is a finished track, not a flawless analysis on the first try.
Your Logic Pro Coach,
Graham English — Author of Logic Pro For Dummies