
This is Part 3 of a 3-part series on building great arrangements with Logic Pro:
- Part 1 - How to Capture and Hold Your Listener's Attention
- Part 2 - How To Save Time and Reduce Audio Editing Hand Cramps
- Part 3 - [You Are Here] - The Logic Pro Arranging and Editing Blueprint
You wouldn't build a house without a blueprint.
I'm sure you could do it. But it's already an exhausting challenge. Why make life harder?
I hope you never shy away from a challenge.
But I hope you put your efforts into smart challenges so you'll have all the creative energy you need to see them through to the end.
Just like building a house, your music producing can benefit from having a blueprint.
When you design a blueprint and work from that...
- Your energy gets used on creating the music instead of figuring out the process
- You can focus on the aesthetic qualities that make your music unique
- You can deliver music that lives up to commercial and artistic standards
And you have energy to spare!
A music producing blueprint takes care of the process so you can focus on the music.
The Music Producer Blueprint
- Phase 1: Compose
- Phase 2: Record
- Phase 3: Arrange and Edit
- Phase 4: Mix and Master
- Phase 5: Promote
For the purpose of this post, I'll focus on Phase 3:
Arranging and Editing
Think about where you are in the process...
- You've finished composing your music and recording all the tracks.
- You've got a project full of tracks that are in need of a final arrangement and final edit.
- You learned some editing tips and tricks in the previous part.
- You also learned the 5 fundamentals of great arrangements in part 1.
With that knowledge and a project full of tracks, this is the ideal way to arrange and edit your tracks...
- Arrange the Song Form
- Arrange the Parts
- Edit the Takes
- Edit the Time, Pitch, Velocity, Details
Arrange the Song Form
If your project was recorded well, it will have markers. If it doesn't, create markers for each song section.
To create a marker at the play head position, memorize the key command in the Navigate > Create Marker menu. For my iMac, the key command is Option-' (Option-apostrophe).
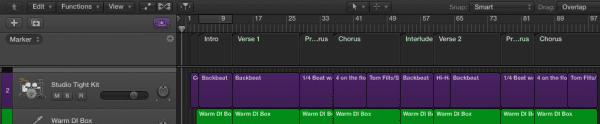
Before you get into the details of your tracks to make them sound better, consider the order and repetition of the song sections.
Ask yourself...
- Which song sections can be shortened?
- Which song sections can be lengthened?
- Which song sections can be repeated?
- Which song sections can be reordered?
You can vary the song form in a ridiculous number of ways, but rather than exploring every possible option and angle...
Give yourself a time limit. Exploring too many options will only make the decision making process harder.
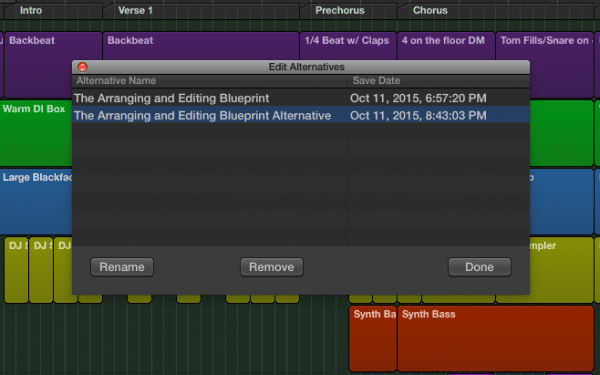
Before you experiment with the song form, you may want to create a new project alternative.
Logic Pro can save alternative projects within a project.
Choose File > Alternatives > New Alternative
You can save a raw untouched alternative for safekeeping, and use a second alternative to cut and paste new song form ideas.
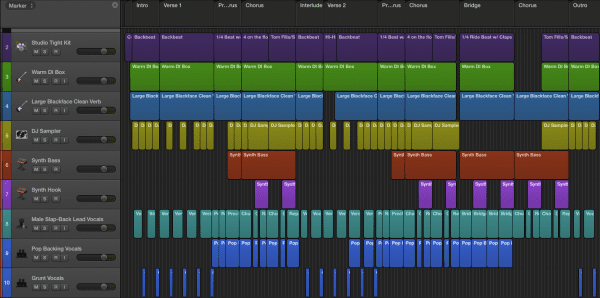
Arrange the Parts
Before you arrange the parts, you want to have the arrangement of the form close to finalized.
Because changes in song form can affect how you'll arrange and stack your parts in the project timeline.
For this discussion, the definition of a "part" is any region or group of regions on a single track or group of tracks. For example, a drum part can have several regions on several tracks while a synth part might have a single region on a single track.
One of the great benefits of arranging parts in a DAW, is in addition to hearing how the music changes and affects you in real time...
You can SEE how the arrangement is built.
Extra Credit: Try mocking up arrangements of songs you admire inside of Logic Pro using empty regions.
Create a project with all the tracks and parts so you can see how the music fits together. It's great practice and it improves your knowledge of different music styles and genres.
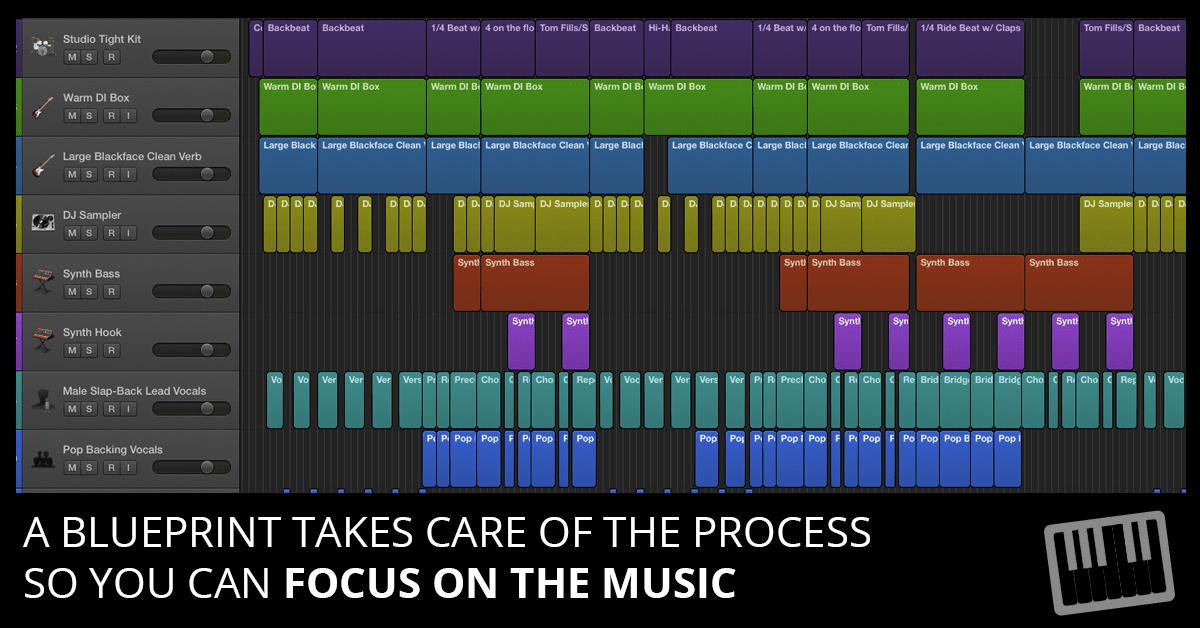
Here's a mocked up arrangement of Locked Out of Heaven by Bruno Mars:
(Get this project template for Logic Pro here)
As you're arranging the parts, review the 5 fundamentals of great arrangements.
- Balance
- Contrast
- Build
- Entertain
- Focus
There's no "right way" to arrange your parts.
YOU get to decide which regions to play, and when and where to play them.
If the project was well planned, your job may be easy. You might not have to change a thing.
But it's common to record more parts than you need.
A big part of arranging is deciding what NOT to play.
Be generous with the mute tool.

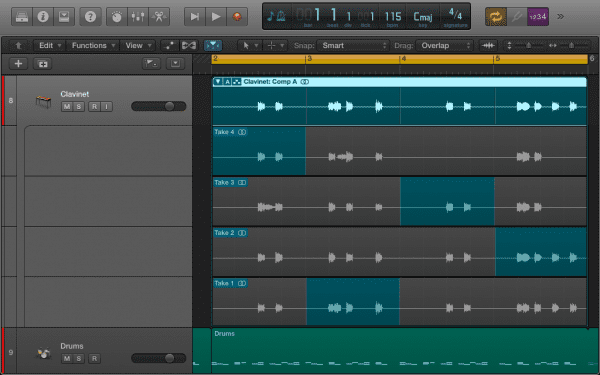
Editing the Takes
Now that your parts are arranged in the tracks area, you can decide if you're using the best take for each part.
A comp take is studio-speak for a composite take, a single take made from many takes.
Comping used to require razor blades and tape before digital audio came along.
With Logic Pro, you can easily create the best take with quick swipe comping.
When you record audio on top of audio in Logic Pro, it puts your recorded takes on multiple lanes of a single track.
You drag through the region to hide or display audio from the take and build a final take.
I mentioned that you can create alternate projects earlier. You can also create alternate comps for almost endless options.
Logic Pro is almost TOO flexible.
Editing Timing, Pitch, Velocity, and Note Details
Now that you've finalized the parts, you can edit the finer details.
There's a good chance you've completed some of these edits already. It's not uncommon to select the best take and make minor edits early on in a project.
Remember that these phases aren't set in stone. They're the general direction in which a music project flows.
It makes logical sense to save the final details for the end after you've moved all the bigger pieces.
IMPORTANT: Be careful with perfectionism. Give yourself time limits instead of working until you're satisfied. Spoiler alert: You'll never be completely satisfied.
You can leverage the tools within Logic Pro to make this part of the process go smoothly. For example:
- The groove track (see the video tutorial in part 2) and groove templates make your tracks follow the same groove.
- Flex time allows you to adjust the timing and groove of your audio performances.
- Flex pitch is a new audio pitch editing feature in Logic Pro. It's intuitive workflow makes pitch correction and creative pitch manipulation a simple task.
- MIDI time and pitch quantization is extremely flexible and easy to master in the various MIDI editors. And you can edit other MIDI details like velocity, note length, pitch bend, aftertouch, and even more MIDI events.
There's so much more that Logic Pro can do for you. That's why I created this special Logic Pro training for music producers...
Arranging and Editing with Logic Pro
- Arranging Your Music
- Editing Audio Tracks
- Editing MIDI Tracks
- Bonus Training: How To Master Musical Textures
- Bonus Training: The Rules and Principles of Counterpoint
- HD Videos, Project Templates, Presets, Cheat Sheets, And Much More!
How To Implement The Arranging and Editing Blueprint
Follow this simple process:
- Arrange the Song Form
- Arrange the Parts
- Edit the Takes
- Edit the Time, Pitch, Velocity, and Details
You can accomplish each step in under 30 minutes for most average-sized projects. Some projects are going to require more time than others.
The important point is to establish a baseline for the time it takes to complete a piece of music.
Your ability to know how fast you can complete a project will make you more valuable as a music producer.
Even if you're not concerned with the demands of modern commercial music, stay motivated by getting more done in less time with less repetitive stress.
You've got a bag of arranging and editing tricks, make a project sound better today.
(NOTE: Need Arranging and Editing training? See Logic Studio Training's Arranging and Editing with Logic Pro training program by clicking here.)
Free Download
Get the Free Arranging & Editing Blueprint
The step-by-step blueprint for building polished arrangements in Logic Pro. Enter your name and email and I'll send it right over.
Your information stays private. No spam, no sharing, ever.