
Logic Pro X comes with the most incredible sound effects on the market. It includes every plugin you need to make great sounding music.
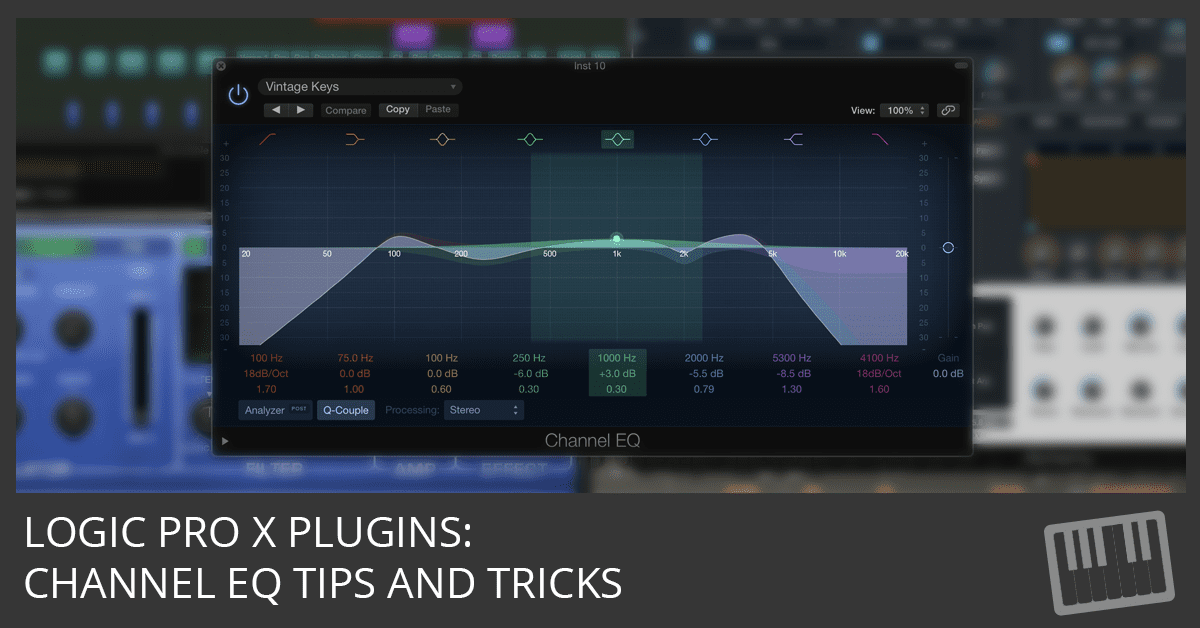
Channel EQ is one of the most-used Logic Pro plug-ins. It’s a powerful sound-shaping tool with simple controls and it’s easy on the CPU.
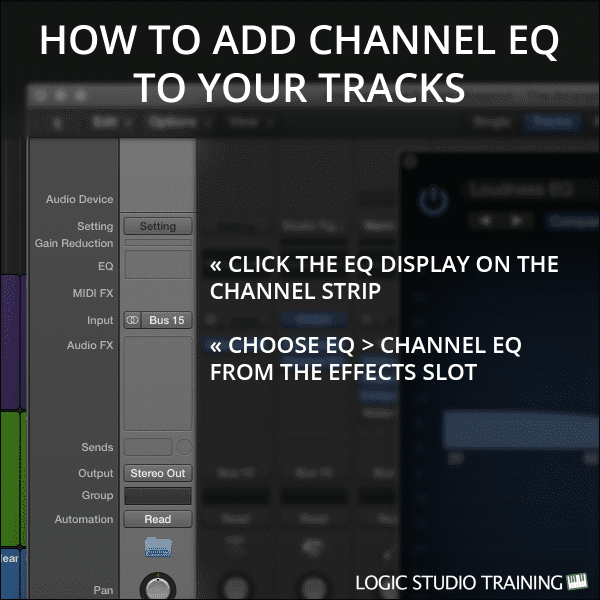
How to Add Channel EQ to Your Tracks
The channel strip is where you adjust the volume and sound of a track. You can find a track’s channel strip in the mixer or track inspector.
- To open the mixer: Press X, choose View > Show Mixer, or choose Window > Open Mixer
- To open the inspector: Press I or select View > Show Inspector
Here are two ways to add Channel EQ to your track:
- Click the EQ display on the channel strip
- Choose EQ > Channel EQ from the channel strip effects slot
How to Use Channel EQ to Sculpt Your Sound
Channel EQ can adjust eight frequency bands simultaneously:
- Band 1: High-pass filter
- Band 2: Low-shelving filter
- Bands 3-6: Parametric bell filters
- Band 7: High-shelving filter
- Band 8: Low-pass filter
Turn the bands on or off by clicking the colored filter icons at the top of the interface. Boost or cut the bands by any of the following:
- Drag the frequency handle in the graphic display
- Drag the gain/slope field below the display
- Click the fields below the display and enter the value

Below the graphic display, you can adjust the following values of the frequency bands:
- Frequency: Adjusts the center frequency of the band
- Gain/Slope: Adjusts the level of boost or cut of the parametric and shelving filters or the slope of the low- and high-pass filters
- Q factor: Adjusts the frequency range that’s affected, also known as resonance (Higher values have a narrower frequency range)
To the right of the graphic display, you can adjust the gain of the entire track with the gain slider.

More Frequency and EQ Tips
Record your project well and you might not need to use much EQ. These tips will help you when you do need EQ:
- Cut to balance track levels
- Boost to add color to tracks
Cutting Frequencies
If you want a track to cut through the mix, either cut the frequencies of any tracks that are masking the track or cut frequencies that are making the track unclear and muffled.
Boosting Frequencies
When you want the track to sound different, boost frequencies. Beware that boosting frequencies can disturb the balance of your mix and cause unwanted phase shift. You may need to adjust the gain of the track after boosting a frequency.
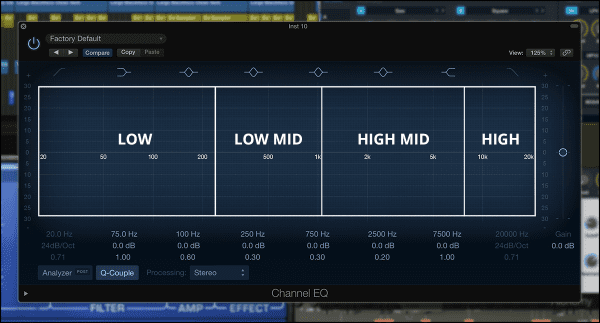
When you need to EQ a track, these generally accepted frequency ranges are excellent starting places:
- Low End: 20-250 Hz
- Lower Midrange: 250-1000 Hz
- Upper Midrange: 1-8 kHz
- High End: 8-20 kHz
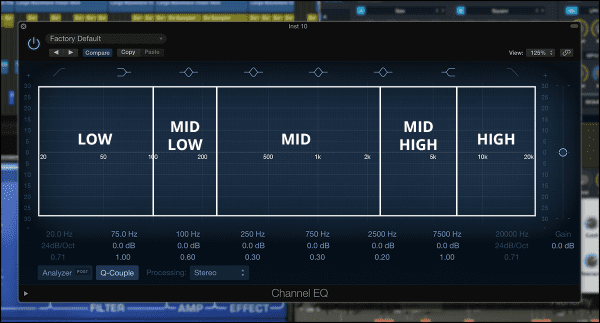
You can divide the low and mid ranges even further to get more divisions. This is useful as your ear advances and you need more frequency range distinctions in your mixing.
- Low: 20-100 Hz
- Mid Low: 100-250 Hz
- Mid: 250-2500 Hz
- Mid High: 2.5-7.5 kHz
- High: 7.5-20 kHz
Remember, there’s no "right way" to EQ your tracks. Every genre is different and there's a range of acceptable sounds within every genre.
If your music sounds good to you and your listeners, it IS good.
For more mixing tips, download the Mixing Cheat Sheet...
Free Download
Get the Free Logic Pro Mixing Cheat Sheet
The essential mixing reference for Logic Pro — key settings, signal flow, and mix decisions on one page. Enter your name and email and I'll send it right over.
Your information stays private. No spam, no sharing, ever.
its nice to hear basic eq tips ,even though i learned this years ago , but you will be surprised at how many people have a laptop , music software like adobe audition , cool edit , protools , etc, and don’t know how to use a eq plugin , all they know is they want there vocal to sound clear , like there is a ” make your vocal clear button ” on the eq. and a lot dont know how to use compression and delays , and dont know about headroom in a mix. my advice is to read about all of those basic things, and watch videos and tutorials and put it into pratice before you spend 800 dollars on a usb microphone , a laptop, headphones, software , mic stand , and a pop filter. just my advice.
thank you guys about channel Eq