
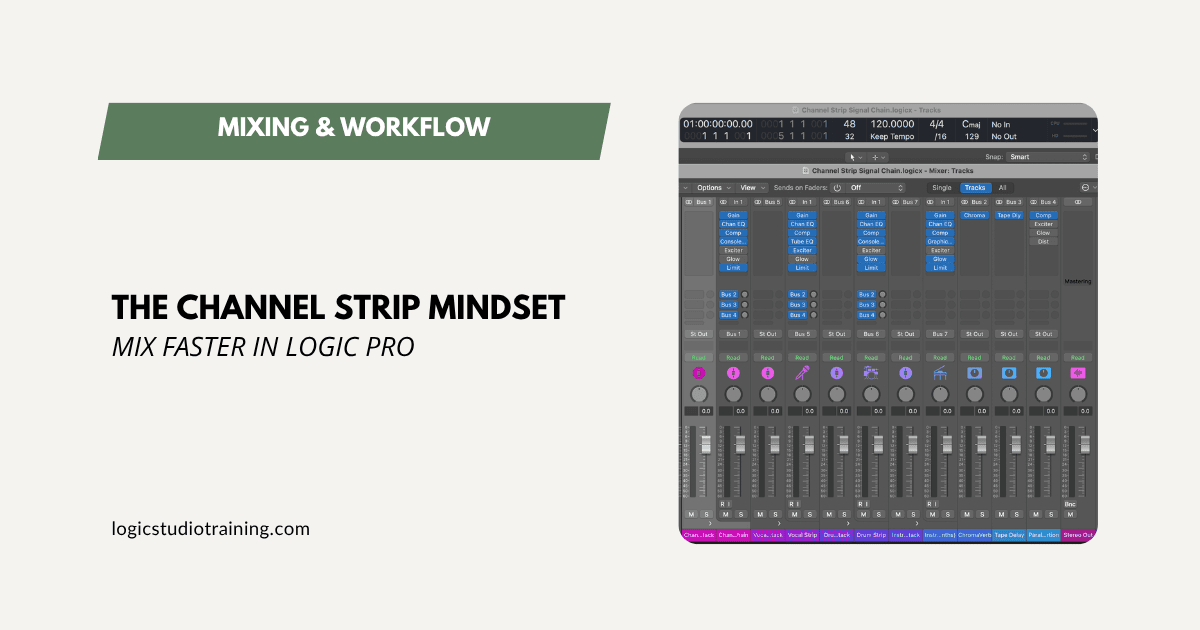
Slow mixes usually come down to one thing: too many choices.
Every track turns into a fresh round of decisions about which plugin to grab and where to put it.
A channel strip mindset removes those decisions. You run the same tools, in the same order, on every track.
This guide shows how to mix faster and more confidently in Logic Pro using only stock tools, by treating each track like it's running through a classic analog console.
What's the Channel Strip Mindset?
A channel strip is a workflow. One sound, one strip, with the essential tools in a set order: gain, filter, compressor, EQ, fader.
Working this way is faster and keeps your focus on the music.
When you stop bouncing between a dozen plugin windows, you stay inside the performance. The work starts to feel like playing again.
Set it up in Logic like this.
Build Your Own Channel Strip With Logic Stock Plugins
Build your custom channel strip from Logic's built-in effects in three steps.
1. Gain → Set the Tone from the Start
Insert the Gain plugin first in your chain.
This is gain staging: getting the signal level right so the plugins after it respond musically. If your signal is too hot, your compressor won't breathe. Too low, and you won't trigger the dynamics at all.
Right after Gain, add Channel EQ and use the Low Cut (High Pass) filter.
Roll off below 30–50 Hz on most tracks, leaving kick and bass alone. On vocals and guitars, cut at 80–100 Hz to clear out rumble and mud.
That already cleans the signal and preps it for compression.
Related: Why Gain Staging Isn't Optional—3 Quick Fixes to Make Your Mix Cleaner Today
2. Compressor → Control the Dynamics
Add Compressor next. Logic's stock compressor is deep, and it's free.
Logic's Compressor gives you seven circuit models, each with its own character:
- Platinum Digital: Clean and transparent. Great for subtle control.
- Studio VCA: Smooth, classic console feel.
- Vintage VCA: Based on the SSL 4000. Great for punchy drums.
- Vintage FET: Fast and aggressive. Think 1176.
- Vintage Opto: Gentle and vocal-friendly.
- Studio FET: Similar to Vintage FET, but more modern.
- Studio Opto: A clean take on opto-style smoothing.
Try this:
- Drums: Vintage VCA, 4:1 ratio, fast attack, medium release.
- Vocals: Vintage Opto, 3:1 ratio, slow attack, slow release.
- Bass: Studio FET, 6:1 ratio, medium attack, auto release.
Turn off Auto Gain and set the Make Up Gain knob by hand. Match the output so the level is the same before and after compression. That way you're judging the compression, not a volume jump.
Related: 4 Essential Compression Settings for Beginners: A Breakdown of Attack and Release Settings
3. EQ → Shape the Tone
You already used Channel EQ for filtering. Now use it again for tone shaping. Or better yet, reach for the Vintage EQ Collection.
Logic gives you three analog-style EQs for free:
- Vintage Console EQ: Neve-inspired
- Vintage Graphic EQ: API-style
- Vintage Tube EQ: Pultec flavor
For punchy mids on guitars, try the Graphic EQ. For silky highs on vocals, reach for the Tube EQ. For thickness on bass, the Console EQ's low shelf does the job.
Pro tip: boost to add character, and cut when something gets in the way.
Related: Logic Pro EQ Tricks That Actually Save Time and Make Your Mixes Better
Your Basic Logic Pro Channel Strip Template
Your channel strip looks the same on every track:
- Gain: Input level and phase control
- Channel EQ: High-pass filter
- Compressor: Level control and punch
- Vintage EQ: Tone shaping
- (Optional) Overdrive / Exciter / Saturation: For character
- Limiter or Utility Gain: Final level out
Save it as a Channel Strip Setting or Patch in Logic so you can recall it instantly.
In Logic:
- Select the track.
- Choose Track → Create Track Stack (Summing Stack).
- Save as a Patch or Channel Strip Setting.
That's your custom console, ready to recall on any track.
Why This Works
Four things happen when you work this way. You stop hunting for plugins, so you move faster. Your ears learn the same tools, so you hear more. Your mixes start to share a signature sound. And with fewer decisions to make, the ones you do make get easier.
This is how engineers worked on analog consoles. They had a fixed toolset and made fast decisions with the whole mix playing.
Real-World Use Case: Mixing Vocals in Logic
Try it on a vocal:
- Drop in the vocal.
- Insert Gain → check that peaks hit around -12 dB.
- Add Channel EQ → cut below 80 Hz, dip 250 Hz if it's muddy.
- Add Vintage Opto Compressor → set the threshold so it's kissing 3–5 dB of gain reduction.
- Add Vintage Tube EQ:
- Boost 12 kHz by 3 dB for air.
- Boost 100 Hz by 2 dB for body.
- (Optional) Add Exciter or Distortion, mixed at 10–15% wet.
- Send the signal to a bus. Add reverb and delay there, not on the track.
This setup keeps you moving without endless scrolling.
Related: How to Build Pro Vocal Chains in Logic Pro—By Genre, Using Only Stock Plugins
Bonus Tips to Lock In the Mindset
- Use Track Stacks to organize: Drums, Vocals, Guitars, each with its own strip.
- Use Buses like group channels on a console.
- Name Your Plugin Chain: "Guitar Clean Strip," "Vocal Warm Strip." Makes recall instant.
- Color Code Tracks: Visual clarity boosts mental focus.
What About FX?
Your core channel strip handles tone and dynamics. Time-based effects live somewhere else.
Set these on buses:
- Bus 1: ChromaVerb (Plate) for vocal reverb
- Bus 2: Tape Delay for slapback or quarter-note delay
- Bus 3: Overdrive for parallel dirt on drums or bass
Send tracks to the buses to taste, and keep the original dry.
Related: Mix Cleaner, Smarter, and Faster with Send Effects in Logic Pro
Final Thoughts
A repeatable workflow is what gets you pro results. Logic already gives you everything you need to build one.
The channel strip mindset is that workflow. You reach for the same tools in the same order on every track, so your hands stop hunting and your ears take over.
The payoff shows up fast. You second-guess less, and your mixes come together in a fraction of the time.
Want the Template?
Grab it here:
Drop it into your Logic project folder and start mixing.
Free Download
Get the Free Logic Pro Mixing Cheat Sheet
The essential mixing reference for Logic Pro — key settings, signal flow, and mix decisions on one page. Enter your name and email and I'll send it right over.
Your information stays private. No spam, no sharing, ever.