

A practical guide to getting your Logic Pro Dolby Atmos mix up and running fast
You want to dive into spatial audio, but the setup feels like piloting a spaceship: mysterious buttons, floating dimensions, and a manual written in a language you don't understand.
Let’s fix that.
Whether you’re creating a Dolby Atmos mix for Apple Music or just want your tracks to feel bigger than stereo, this guide breaks it down. These are the 7 core elements you need to understand—and more importantly, how to set them up right in Logic Pro.
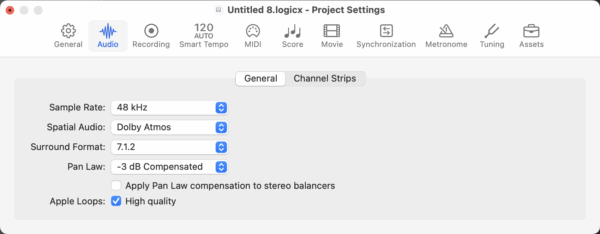
1. Surround Format – Choose your channel playground
Your first step is to set the foundation.
Logic Pro offers multiple surround formats, ranging from 5.1 to 7.1.4. Dolby Atmos projects default to 7.1.2, but you can adjust this setting if needed.
To set it up:
- Go to
File > Project Settings > Audio - Under the “Surround Format” pop-up, pick your format:
5.1, 7.1, or 7.1.2 for Dolby Atmos.
💡 Use 7.1.2 if you want overhead speaker support (and you're exporting to Atmos).
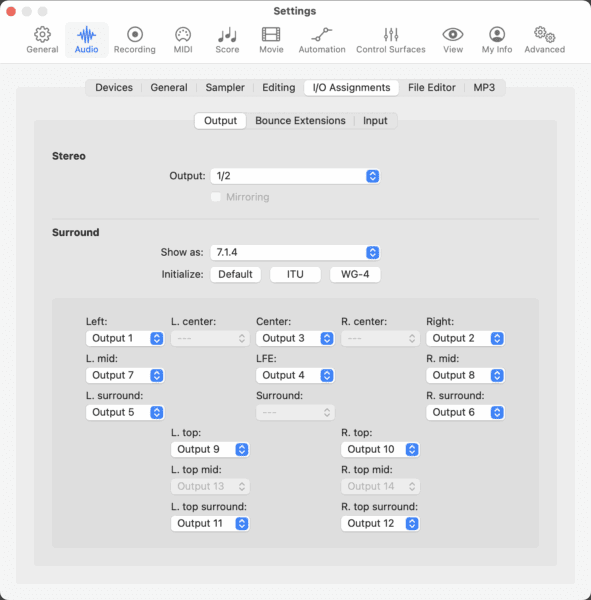
2. Speaker Configuration – Route it or lose it
If you’re using actual speakers, not just headphones, your interface needs at least as many outputs as your format requires.
For example:
- 5.1 = 6 outputs
- 7.1.4 = 12 outputs
To route speakers:
- Go to
Settings > Audio > I/O Assignments > Output - Use “Initialize” presets like Default, ITU, or WG-4
(ITU is what pros use. Start there.)
If you’re only monitoring with headphones, you can skip this and let Logic handle the binaural magic.
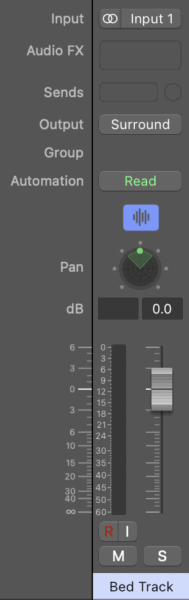
3. Bed Tracks – Your traditional surround base
Think of bed tracks as your background layer. These tracks are panned using the Surround Panner and routed to a surround bed.
Logic allows one surround bed per Atmos project.
Here’s what to do:
- When you create a track in a Dolby Atmos project, it defaults to a bed track
- Use the Surround Panner to spread it around your surround field
- Bed tracks support mono, stereo, or surround formats
💡 Use bed tracks for drums, bass, pads—anything that sits in the mix rather than moves.
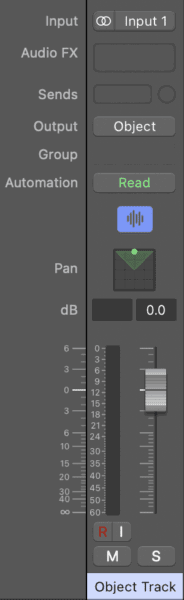
4. Object Tracks – Full 3D freedom
This is where spatial audio really shines.
Object tracks don’t get routed to traditional speakers—they float in 3D space using the 3D Object Panner. That pan data gets exported as metadata.
Each object corresponds to a separate channel in the Dolby Atmos plug-in, supporting up to 118 objects.
To create one:
- Click the track’s Output slot → choose 3D Object Panner
- Pan freely in XYZ space
- Use for vocals, synth leads, FX—anything that needs movement
💡 Mono = 1 object. Stereo = 2 objects.
5. Dolby Atmos Plug-in – The brain of the mix
This plug-in renders your spatial mix. It combines audio from bed tracks and object tracks, handles binaural rendering for headphones, and exports your ADM BWF master.
It’s auto-inserted on the master when you enable Dolby Atmos.
What you can do:
- Set your monitoring format: 7.1.4 speakers? Headphones?
- View your 3D object positions in real time
- Adjust binaural render modes per object (e.g., off, head-locked, spatial)
💡 Headphones only? Use Spatial Audio Monitoring instead to emulate a 3D environment.

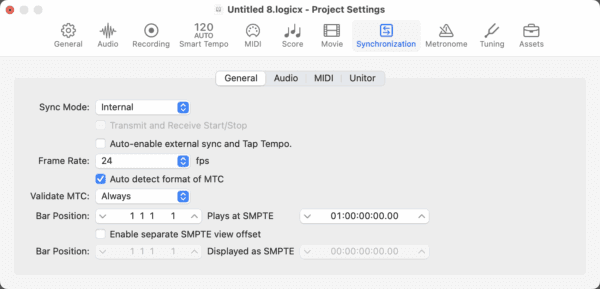
6. Sample Rate & Frame Rate – Set it right, or risk regrets
Dolby Atmos performs best with sampling rates of 48 kHz or 96 kHz. Logic will convert your 44.1 kHz sessions, but it eats up CPU and can mess with your timing.
Frame rate for Atmos music? Always 24 fps.
Here’s what to do:
Project Settings > Audio > Sample Rate→ set to 48kHzProject Settings > Synchronization > Frame Rate→ set to 24 fps
💡 If you’ve already recorded audio at a lower rate, bounce-in-place before changing the sample rate.
7. Monitoring Format – Hear what your listener hears
You’re not done until you know how the end user will hear it.
With the Dolby Atmos plug-in, you can switch between:
- Headphones (binaural)
- Stereo downmix
- 7.1.4 Speaker Formats
To change this:
- Open the Dolby Atmos plug-in on the master
- Choose from the Monitoring Format dropdown
Test in multiple formats. Your 3D panned reverb may sound amazing on speakers, but vanish in binaural.
💡 Use Apple’s Personalized Spatial Audio feature if mixing for AirPods users—it uses custom ear geometry for playback.
To Recap: Your 7 Core Elements
- Surround Format – Choose 7.1.2 to access Atmos height
- Speaker Configuration – Only matters if not using headphones
- Bed Tracks – Use for foundational mix elements
- Object Tracks – Use for 3D movement and depth
- Dolby Atmos Plug-in – Central hub for rendering and exporting
- Sample/Frame Rate – Set to 48 kHz and 24 fps before you record
- Monitoring Format – Use multiple renderers to compare mixes
If you want a shortcut...
Here’s a setup template you can build once and reuse:
- Start a new project from a template
- Set Surround Format to 7.1.2
- Set Sample Rate to 48 kHz
- Enable Dolby Atmos and confirm the Atmos plug-in is on the master
- Route your instruments:
Bed = drums, bass, pads
Object = vocals, leads, FX
Save it as:
Logic Spatial Template (7.1.2, 48kHz, Atmos).logicx
Don’t wait until your final mix to figure this out.
Getting these 7 elements dialed in before you hit record saves you hours of troubleshooting later.
Now go make your tracks sound like they live in a galaxy.
Or at least… a really big room with a killer ceiling reverb.
Enter your first name and email address and click the "Get Access Now!" button to get your free mixing guide.
Your Information is 100% Secure And Will Never Be Shared With Anyone!