
Session Players in Logic Pro are like the best studio musicians you never have to pay.
They don’t flake, they don’t argue, and they nail the take on the first try.
They also follow your chords, respond to your arrangement, and play in whatever style you need—rock, R&B, jazz, you name it.
But the part most users miss is that these players aren’t just plug-and-play.
They’re programmable, reprogrammable, and, when used correctly, completely personalized to your track.
This tutorial shows you how to:
- Add and customize Session Player tracks
- Get players to follow your chord progressions and rhythms
- Edit their performances like a real producer (not just a loop-dropper)
- Convert them to MIDI or patterns when you want complete control
- And build a better band—one region at a time
Let’s dive in.
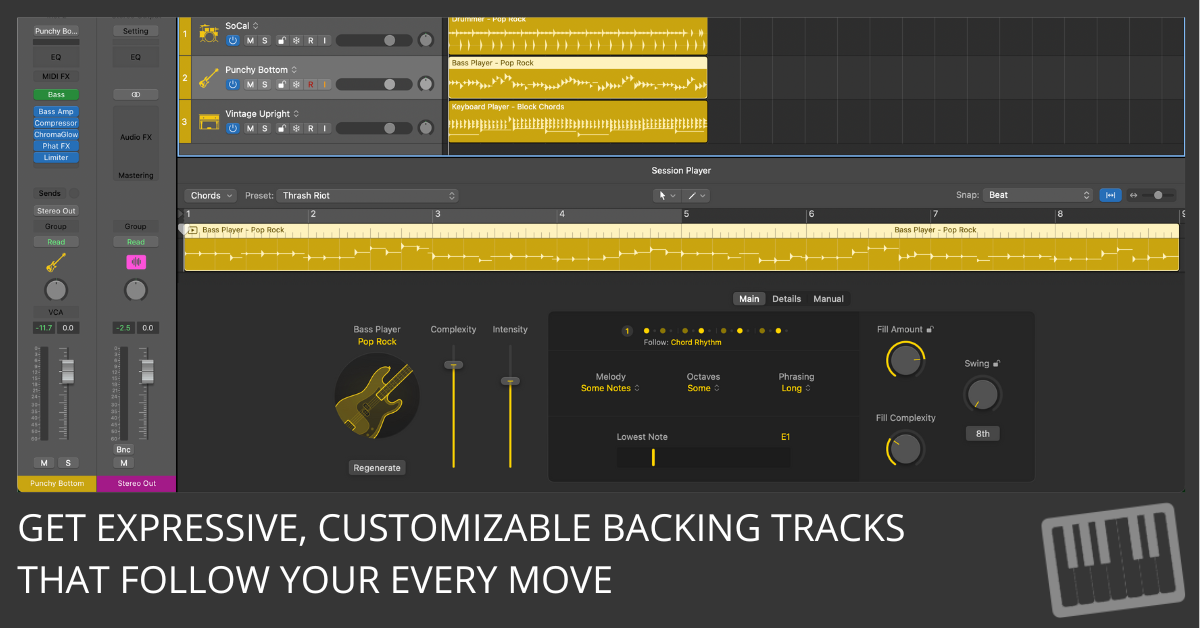
🎸 Step 1: Add a Session Player to Your Project
To start, you’ll need a track with a Session Player region. Here’s what to do:
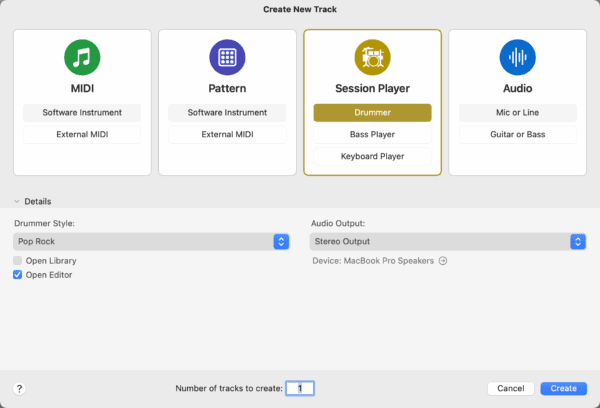
- Hit
Option–Command–Uor choose Track > New Session Player SI Track. - In the New Tracks window, choose Drummer, Bass Player, or Keyboard Player.
- Want something other than the default style?
Click the Details arrow and pick a style from the Style dropdown. - Click Create.
Now, what you get depends on your session:
- No arrangement markers? You get one 8-bar Session Player region.
- Got arrangement markers? Each section gets its own region.
- Using the Cycle area? That becomes the region length.
- Selected a Marquee area? Same deal—Logic builds your region to match.
You’ve just hired your virtual band. Time to tell them what to play.
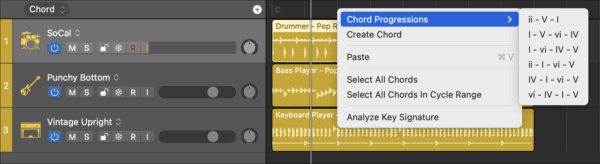
🎼 Step 2: Write Your Chords (And Make the Players Follow Them)
Session Players don’t guess your chords. You have to tell them.
There are two ways:
- Global Chord Track – affects all players at once.
- Region Chords – overrides the global setting for just that section.
To use the Chord Track:
- Open the Global Tracks view (
G). - Click the + button on the Chord Track and start adding chords.
For example, type in: C – Am – F – G.
Tip:
To override with Region Chords:
- Select a Session Player region.
- Open the Session Player Editor (
E). - Click the chord symbols above the pattern view and enter your own changes.
Now the Bass Player and Keyboard Player will lock in and follow your progressions.
Here’s a quick trick almost nobody knows:
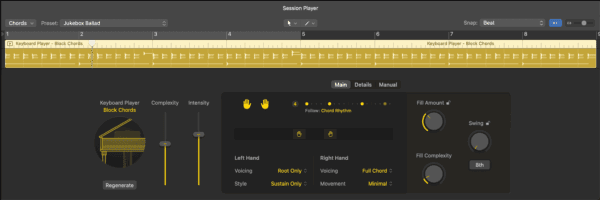
🧠 Step 3: Customize the Performance in the Session Player Editor
This is where the magic happens.
Open the Session Player Editor and start shaping the performance.
Here’s what you can tweak:
- Complexity – Drag the slider right to get busier fills, flourishes, and rhythmic tricks.
- Intensity – More push, more energy. Great for choruses.
- Fills – Control how often and how wild they get.
- Swing – Add a groove. Choose 8ths or 16ths.
- Feel – Drag up for ahead-of-the-beat, down for laid-back.
- Humanize – Loosen the timing just enough to feel real.
Want a quick remix of the same region? Click Regenerate, and Logic gives you a fresh variation with all your settings intact.
🎹 Step 4: Deep-Dive Into Instrument-Specific Controls
Each player has unique tricks up their sleeve.
Keyboard Player:
- Left/Right Hand – Mute one, adjust hand positions with sliders.
- Voicing – Play root-only, add fifths, octaves, or full voicings.
- Style – Choose from sustained pads to syncopated grooves.
- Grace Notes – Add flourishes for realism.
- Phrasing – Especially useful for block chords, arps, or pads.
Bass Player:
- Melody – Control how much the bass sticks to the root or walks around.
- Octaves & Slides – Add low-end power or funky transitions.
- Dead Notes & Mutes – Create that percussive, slap feel.
- Lowest Note – Set a floor to mimic 4-string or 5-string basses.
- Blue Notes & Slaps – For upright, blues, and vintage feel.
Drummer:
- Kit Piece Control – Mute or unmute individual drums.
- Snare & Cymbal Articulation – Choose brushes, taps, or full hits.
- Percussion – Add claps, tambourines, shakers.
- Phrase Variation – Let the groove evolve across bars.
Don’t just pick a preset. Dial in the details until your track grooves the way you hear it in your head.
🔁 Step 5: Make Them Follow the Rhythm of Other Tracks
Want your Session Player to follow your strummed guitar rhythm?
Here’s how to make that happen:
- Select the Session Player region.
- Open the Session Player Editor.
- Click the Patterns button (Kick & Snare for Drummers).
- Under Follow Rhythm Of, choose the guitar track.
You can also toggle Follow Chords to make your player emphasize changes—great for choruses and turnarounds.
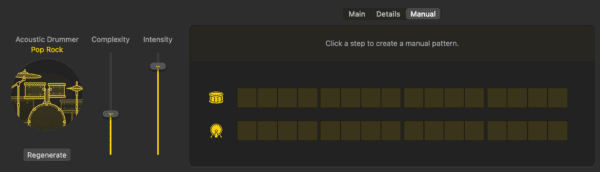
🎛 Step 6: Build a Custom Pattern from Scratch
Prefer programming your own grooves? You can create patterns manually using a 16-step sequencer.
Here’s how:
- Open the Session Player Editor.
- Click the Manual button.
- Click dots to activate beats (1 dot = 1/16 note).
- Adjust the pattern length using the Length menu.
To copy and paste sections:
- Use the Action menu → Copy Page / Paste Page
To wipe the slate clean:
- Action menu → Reset
Build your patterns like drum machines or synth sequences—perfect for hyper-specific rhythmic control.
🌀 Step 7: Convert to MIDI or Pattern Region (When You Need Total Control)
Sometimes you want to go beyond styles and presets. That’s when it’s time to convert.
To edit in the Piano Roll:
- Control-click a Session Player region.
- Choose Convert > Convert to MIDI Region.
To edit in Step Sequencer:
- Control-click the region.
- Choose Convert > Convert to Pattern Region.
Important: Any Session Player magic will be lost—this becomes raw MIDI or patterns. But it’s yours to bend, break, and reshape however you want.
Want to bring the band back? Just right-click your MIDI region and choose Replace with Session Player Region.
🥁 Bonus: Unlock the Multi-Channel Drummer for Pro Mixing
Want access to 15 individual drum mic channels?
You’ll need a multi-out kit.
- Open the Library (
Y) and look for drum kits with a “+” at the end of their name. - Select one to load a full multi-mic patch.
- Go to Logic Pro > Settings > Audio > General and set Latency Compensation to All.
- Enable Low Latency Mode for real-time playing.
Now you’ve got complete fader control over kick in, kick out, snare top, snare bottom, overheads, rooms—you name it.
This is how you mix drums like a pro.
🎯 Wrap Up: Your Session Players Are Only as Smart as You Make Them
Don’t just settle for default loops. You have a full band at your fingertips—fully programmable, obedient, and tweakable.
Use Session Players to:
- Write faster
- Produce more efficiently
- And create tracks that sound like you recorded with live players
No more dragging loops and hoping they fit.
No more stale grooves.
No more “good enough.”
Give your track the rhythm section it deserves.
And make sure they show up on time, just like you.
Enter your first name and email address and click the “Get Access Now!” button to get your free guide.
Your Information is 100% Secure And Private!